In Part 1 of this blog series I demonstrated by way of examples how App Makers can surface a substantial amount additional metadata generated for numerous type of files uploaded to different types of SharePoint Libraries such as EXIF metadata, tags, keywords etc.
Surfacing metadata embedded in images uploaded to SharePoint in particular has drawn much criticism when Microsoft deprecated the functionality to automatically import the EXIF properties into the image properties.
Microsoft’s suggested resolution was to run a CSOM every time you upload new images to the library however many developers and end users rightly vented their frustrations given a significant change such as this one would no doubt have broken existing business solutions dependant on that capability.
Fortunately I found a way to nonetheless at least expose that metadata and as such posted an earlier blog in December 2019. I subsequently further enhanced and enriched the initial Power Automate flow in Part 1 of this blog series and equally showcased (and shared) a Power App that consumes said flow.
In my previous two blogs on this topic I described how additional metadata such as EXIF metadata can in fact be surfaced by leveraging the SharePoint RenderListDataAsStream REST API, enabling users to at least extract that metadata albeit not automated.
In Part 2 of this blog series I am now going to describe, again by way of example, how you can equally surface near identical metadata from numerous type of files uploaded to any libraries, but this time using the SharePoint v2 Graph Drive Items REST API.
In accordance with disclaimer Microsoft state in terms of the usage of the supposed beta versions of the Graph v2 APIs to quote “in production applications is not supported“ and “subject to change“, I equally as such have to cite that same disclaimer as all the functionality showcased in this blog is entirely made possible leveraging the Graph v2 “beta” APIs. Having said that, the Drive Items v2 API has been in beta for 18 months seemingly unchanged.
In an extensive blog I published about 6 months ago, I went into great detail on how to consume a number of Graph v2 APIs. In particular as is relevant to this blog I shared significant insight insofar as leveraging the Drive Items API is concerned. Given the level of detail that I delved into in my earlier blog, there is no need to restate the purpose of this API nor how to consume it.
Thus in this blog I am “simply” going to demonstrate how you can by all accounts surface the same rich metadata whether you choose to consume either the RenderListDataAsStream REST API or the Graph v2 DriveItems REST API for that matter.
Power Apps MSM Demo – Graph v2 API
First let’s take a look at the updated demo Power App I shared in Part 1 and see how the Graph v2 Drive Items API stacks up as compared to what I showcased consuming the RenderListDataAsStream API…
RenderListAsStream vs Graph v2 API(s)
How does the SharePoint RenderListAsStream REST API stack up when compared with the SharePoint Graph v2 Drive Items REST API?
By all accounts there is practically no difference insofar as what additional media service metadata I was able to surface leveraging either of the two APIs. Wow! I did it once with the RenderListAsStream REST API and within just a few days later I was able to expose exactly the same metadata but this time using the Graph v2 Drive Items REST API ?. When I posted Part 1 I had NO predetermined expectations nor intentions of accomplishing the same outcomes as I have now posted in Part 2.
Naturally that begs the question: Surely there must be some differences?
Absolutely, there are most definitely many differences between what each of the 2 APIs can do insofar as exposing and surfacing metadata for content stored in SharePoint. That said, for the demo app at least showcased in both Part 1 and now in Part 2 the schema of the Response step in both 2 Power Automate flows are nonetheless identical.
Whilst the schema of both flows are identical there are a few noteworthy differences insofar as the result set each of the flows returns. Some of those differences I have listed in the following table.
| RenderListDataAsStream REST API | Graph v2 Drive Items REST API |
|---|---|
| The complexity level with this API is high and as such it can be overwhelming to understand and tweak it to your specific requirements. | The Graph v2 APIs have quite possibly been implemented leveraging a subset of the RenderListDataAsStream API. Accordingly these APIs are by accounts easier to understand and work with albeit at the cost of implementing a smaller subset of capabilities that the RenderListDataAsStream API can. |
| When invoking the RenderListDataAsStream API I specified “RecursiveAll” for the View Scope attribute in the ViewXML body parameter. Accordingly all items in the library are returned regardless of the folder in which those files are located. That said it is possible with this API to return only items in a specific folder if so desired. | The Drive Items API returns items in a specific folder, i.e. not recursively. If the library being queried contains folders, the flow needs to be run again to surface drive items (files) for each folder in the library being queried. |
| There are countless ways to invoke the API with delegatable filters and sort and equally filter using OData system query options. | There are limited OData system query options that actually work. |
The differences between the APIs as I have noted in this table are certainly not comprehensive and as such should not be taken as definitive. By sharing both flows and the demo app I developed you’ll no doubt find the SharePoint_MSM_DriveItems flow significantly easier to follow when compared with the SharePoint_MSM_RenderListDataAsSteam flow, insofar as complexity is concerned.
By comparing the steps in each of the flows should hopefully provide you suffecient insight given a comprehensive example of how to accomplish the near identical outputs surfacing the same metadata albeit with completely different techniques (i.e. APIs consumed). Developers in particular have vented their frustrations in the past 18 months on various forums that it is no longer possibly to surface metadata such as EXIF metadata for images / photos uploaded to SharePoint. Now in the space of about 2 weeks I’ve demonstrated how you are in fact able to accomplish this in not only one but now two entirely different ways ?.
Key steps in the SharePoint_MSM_DriveItems & SharePoint_MSM_RenderListDataAsSteam flows & how they compare to one another
Subsequent to posting Part 1 of this blog series I made a few changes to the flow I shared in my previous blog mostly related to the input parameters that need to be passed to flow mostly such that both flows now have similar input parameters and equally more meaningful to anyone to consume. Thus in this section the focus will be on the input parameters passed to each of the 2 flows, the steps that invoke either of the two APIs and finally on the Fields To Return step in each of the flows. Insofar as all the other steps in each of the flows are concerned I have added comments for most of the steps in the flow that hopefully should give you enough insight pertaining to the purpose of each step.
SharePoint_MSM_RenderListDataAsSteam
Flow Input Parameters
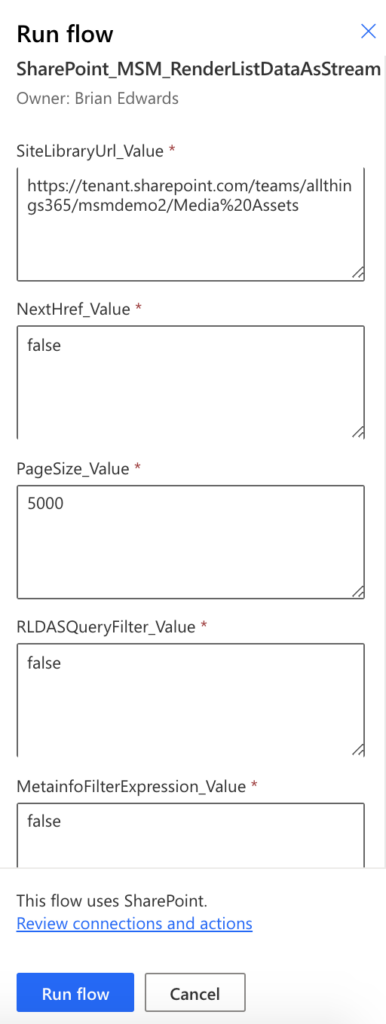
SiteLibraryUrl
The full URL to the Document Library. For example:
“https://tenant.sharepoint.com/teams/allthings365/demo/Shared%20Documents”
NextHref
Used to manage paging when the total number of items in a Library exceeds the number specified in the Page Size variable. For the first page of results this input parameter variables specified when running this flow should be “false”
PageSize
The page size threshold (1-5000)
RLDASQueryFilter
“false”
Placeholder for future implementation
MetainfoFilterExpression
Used to filter the result set returned by the RenderListDataAsStream API
SharePoint_MSM_DriveItems
Flow Input Parameters
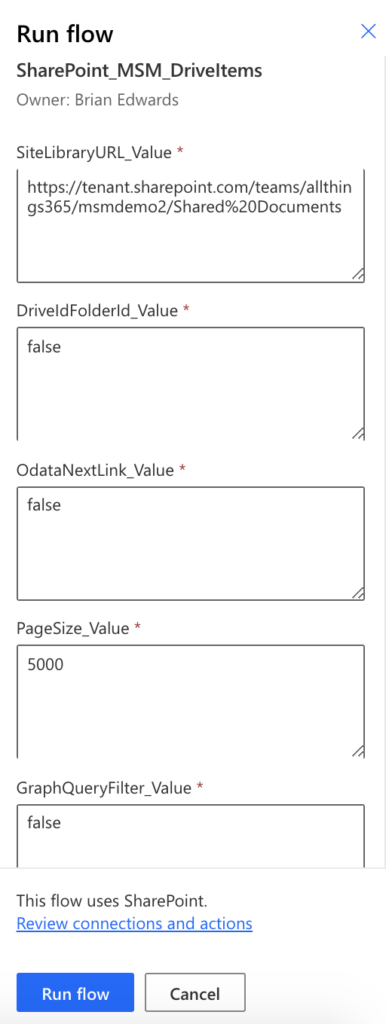
SiteLibraryURL
The full URL to the Document Library. For example:
“https://tenant.sharepoint.com/teams/allthings365/demo/Shared%20Documents”
DriveIdFolderId
“false”, or to retrieve the items within a folder “drives/DriveId/items/FolderId”
For example: “drives/b!L6KQhCO3JU2esQgLKuC2RnnRGFV44345fscMw5aGwl-h8E5o4rFvdbDmSZspYnvMLwqU/items/01SHFS45EGWASOWGFDFG345L7BWNLVHE”
OdataNextLink
Used to manage paging when the total number of items in a Library exceeds the number specified in the Page Size variable. For the first page of results this input parameter variables specified when running this flow should be “false”
PageSize
The page size threshold (1-5000)
GraphQueryFilter
“false”
Placeholder for future implementation
As should be evident, the input parameters for both flow are very similar. I added a placeholder for potentially implementing the ability to refine the outputs of each of the flows using a query filter input parameter to each of the flows. Perhaps in Part 3 of this blog series…
Send HTTP Request to SharePoint
Get Library Items
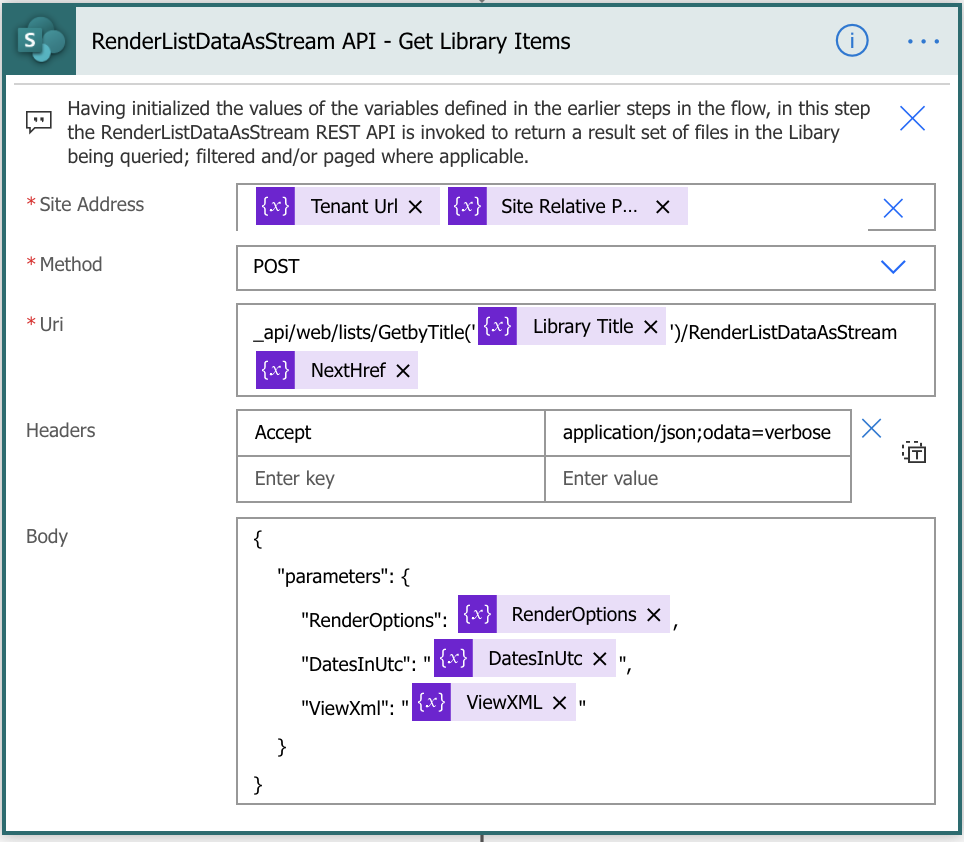
Site Address
The Site Address is derived from the full URL to the library being queried from the SiteLibraryUrl input parameter to the flow
Uri
Interestingly enough for this flow at least the Uri is relatively simple.
Body
The Body is where the CAML XML query to invoke the RenderListAsStream API. The value of this is derived having set variables earlier in the flow for readability purpose.
Send HTTP Request to SharePoint
Get Drive Items
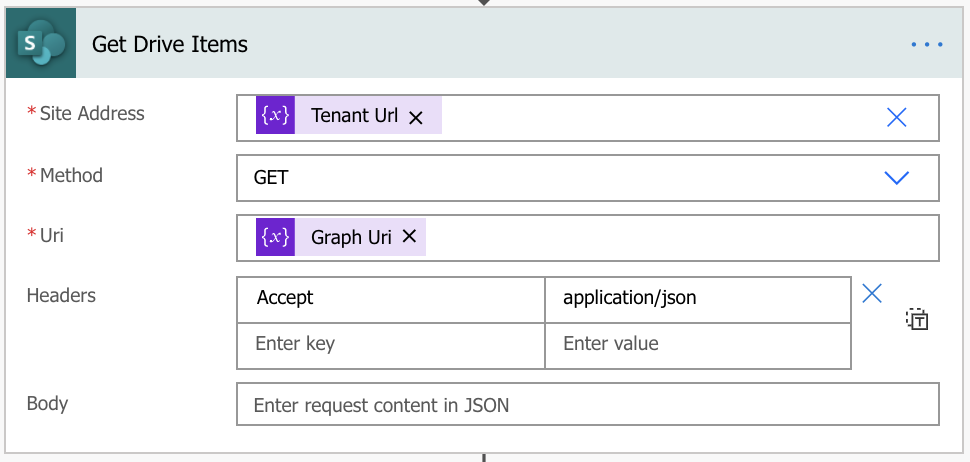
Site Address
For this flow the Site Address is the URL for your SharePoint tenant. For example:
https://tenant.sharepoint.com
Uri
The Uri property is derived earlier in the flow in a variable which when the flow runs will look similar to the following example Uri:
“_api/v2.0/sites/tenant.sharepoint.com,[SiteId]/root/children?$expand=thumbnails($select=large),listitem($expand=fields($select=[Fields))&$select=*&$top=5000”
When someone strings together the right parameters to pass to either of these APIs, it doesn’t look all that complex considering the rich metadata both these APIs expose ?.
Fields To Return
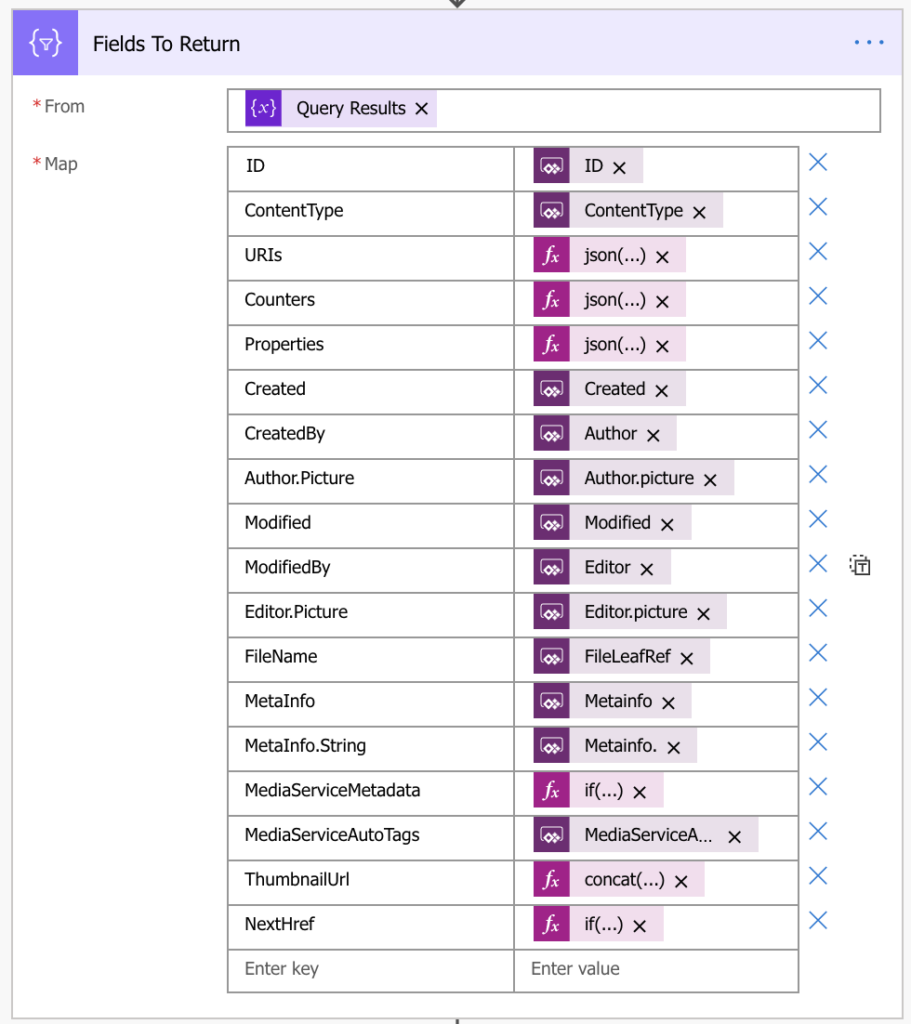
Fields To Return
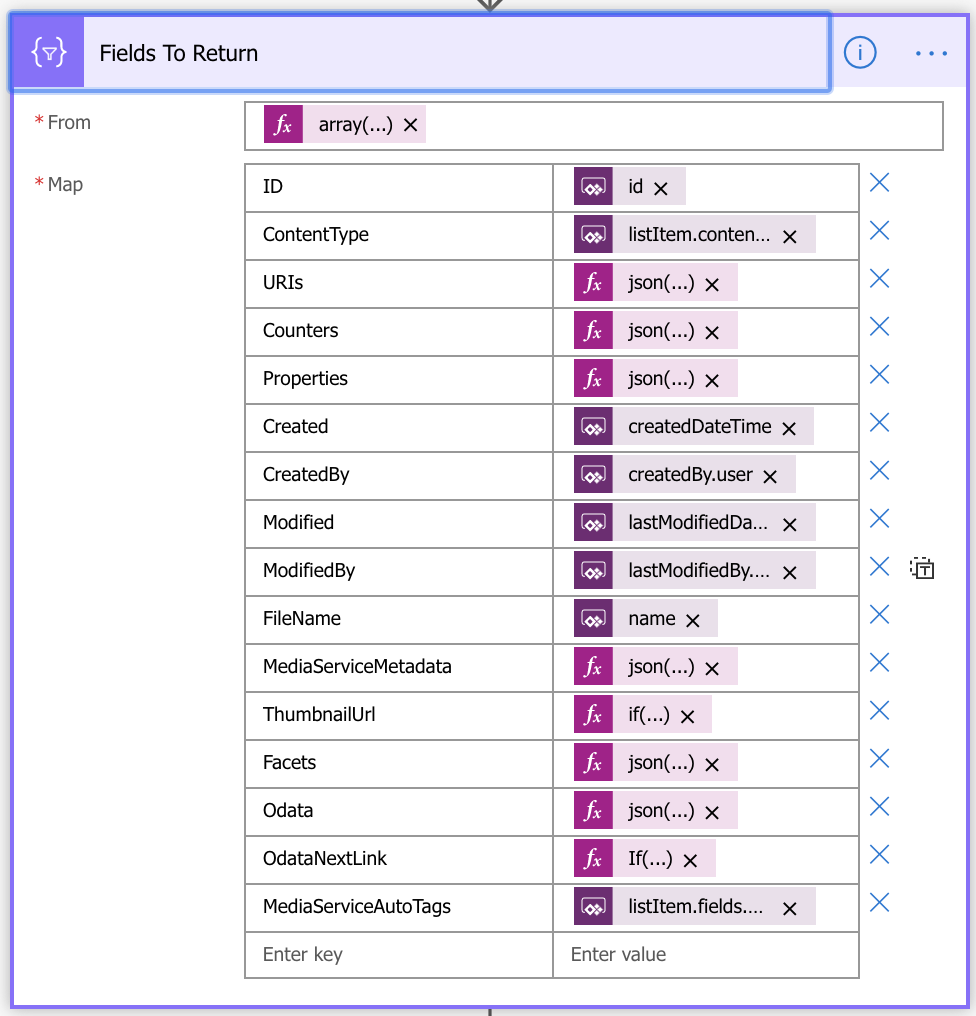
For comparative purposes I have included a screenshot of the Fields To Return steps in each of the flows. The expressions used for some of the fields in either flow can no doubt be quite daunting to many people reading this blog. The most important field in both of the flows where the vast majority of rich metadata for files in any given library being queried is the MediaServiceMetadata field. How it is derived is somewhat different in either flow but the essence of the expression used in either flow surfaces the same data. The crux of the expression looks along the lines of the following:
json( item()?['MediaServiceMetadata'] )The real key as to how this flow is able to surface the data in this field is subsequently defined in the final Response step in both flows where the schema for the MediaServiceMetadata field is strictly defined such that the data exposed in the field can be consumed in a Power App in a structured way that Power Apps requires.
Download the v2 version of the Power App and Power Automate flows as showcased in this blog
The source code including the Power App and the associated Power Automate flows have been shared on GitHub.
GitHub – Power Apps, Power Automate & SharePoint Media Service Metadata Magic
Before uploading this Power App into your environment you will need to ensure the user uploading the package via the “Import canvas app” link in the Power Apps web studio has a Power Apps Plan 2 license or Plan 2 Trial license assigned to that user. If not, when importing the app you will probably receive an error message indicating the 2 flows associated to the app were not imported, with a rather obscure error message which, if you can find will inform you that user does not have a license plan necessary to import the app.
Per a thread on the Power Apps community site you can obtain a 90 day trial license in order to test and evaluate this app in your Power Apps environment per the following links for additional insight (and to sign up for the trial license):
https://powerusers.microsoft.com/t5/Building-Power-Apps/What-is-quot-Microsoft-PowerApps-Trial-Plan-2-quot/m-p/131622#M45812
https://powerapps.microsoft.com/en-us/#
Whilst I do not speak for Microsoft and as such cannot categorically state the necessary licensing requirements associated with users of this solution as is showcased (and shared) in Part 1 and Part 2 of this blog series, it is my understanding at least that a Power Apps Plan 2 licence is required for any/all uses managing and/or editing the Power App. Each user of the app and therefore equally the 2 Power Automate flows consumed by the app will either each require a Power Automate flow Plan 1 license OR a Power Automate per flow (actually 5 flows) license which will accordingly almost certainly lower the costs of implementing a solution such as this one for numerous users in your organizations with the additional added benefit of both flows being exceedingly reusable for other use cases and apps you may create ?.
All donations for sharing gladly accepted!
Thank you very much for this post.
I’m new working with Power Automate and since day I try to extract some metadata but without any success 🙁 Please can you help me (I’ll pay for it if needed)?
I have the following output:
“MediaServiceMetadata”: “{\”ctag\”:\”\\\”c:{a9c1b4df-3c8f-4cd8-aa76-68e4c26119a6},2\\\”\”,\”generationTime\”:\”2020-08-30T12:38:48.7697798Z\”,\”lastStreamUpdateTime\”:\”2020-08-30T12:38:48.7697798Z\”,\”modules\”:[{\”module\”:\”ThumbnailGeneration\”,\”version\”:1},{\”module\”:\”MetadataExtraction\”,\”version\”:1},{\”module\”:\”ObjectDetection\”,\”version\”:7},{\”module\”:\”ReverseGeocoding\”,\”version\”:1},{\”module\”:\”SystemTags\”,\”version\”:1},{\”module\”:\”TextExtractionData\”,\”version\”:1},{\”module\”:\”TextExtraction\”,\”version\”:2}],\”media\”:{\”author\”:[\”freshfocus\”],\”copyright\”:\”Sabine Ingold/statim design\”,\”keywords\”:[\”Sport\”,\”Fedcup\”,\”swiss tennis\”,\”tennis\”,\”2020\”],\”title\”:\”04.02.2020; Zürich; TENNIS – Tennis Fed Cup – Schweiz – Kanada; Pre-Draw-Pressekonferenz; \\r\\r(Sabine Ingold/statim design)\”},\”photo\”:{\”dateTaken\”:\”2020-02-04T13:37:42+00:00\”,\”width\”:1200,\”height\”:800},\”tags\”:[{\”name\”:\”person\”,\”localizedName\”:\”Person\”,\”confidence\”:0.996893048286438}]}”,
At “Select – Fields to Return” I like to return for example the content of “Copyright” but I don’t know how I can do it. I tried so many things but nothing is working.
Please can you give me an example (expression code?) how I can extract the content of copyright (\”copyright\”:\”Sabine Ingold/statim design\”)?
Thank you very much
Sabine
Hi Sabine,
Firstly apologies for the very late response – life happens ?.
No doubt you’ve long moved on past this, however I nonetheless think your question is still relevant such that other people reading this blog post may face similar changes for their own use cases and understandably the expressions I used in the flows especially in the Fields to Return step are exceedingly difficult to follow, let alone clone and rework so as to add your own more specific fields to return to your apps.
Accordingly, using the example you noted being Copyright as a desired new field to return, I spent some time looking into this insofar as what expression can be used to return only the Copyright value from the MediaServiceMetadata field for any given document. I believe I have now figured that out, albeit with limited testing.
The expression I used for a new field mapping “Copypright” added to the “Fields to Return” action in the flow is as follows:
if(empty(json( if( empty( item()?['listItem']?['fields']?['MediaServiceMetadata'] ), '{}', item()?['listItem']?['fields']?['MediaServiceMetadata'] ) )?['media']?['copyright']),'',json( if( empty( item()?['listItem']?['fields']?['MediaServiceMetadata'] ), '{}', item()?['listItem']?['fields']?['MediaServiceMetadata'] ) )?['media']?['copyright'])When adding or changing field mappings in the Fields to Return step in the flow, you equally need to ensure those changes are reflected in the final step in the flow Response action Response Body JSON Schema. For this change the schema definition for the new Copyright field being returned needs to be added to the existing Response Body JSON Schema.
To do this copy the current schema into a text edit app, locate the definition for the OdataNextLink field, copy that field defintion schema such that it looks along the lines of:
"OdataNextLink": {"type": "string"
},
"Copyright": {
"type": "string"
}
Thereafter copy the entire updated schema definition back into the Response Body JSON Schema property on the Response action step in the flow. Save the flow. I recommend testing it with a previous (successful) flow run trigger. Hopefully all goes well!
In your Power App(s) you’ll need to remove the flow from the app and add it again in order for Power Apps to recognise the change(s) to the Response schema definition.
I have shared the updated Power Automate flow on GitHub that now includes returning a new field containing only the Copyright value (if present) as I’ve described here:
SharePoint_MSM_DriveItems_v4
Warm regards,
Brian