Wouldn’t it be awesome if you could fill in a booking form in PowerApps that creates an item in a list in SharePoint, which in turn triggers a Power Automate flow that automates the creation of a Microsoft Word document, converts that document to a PDF which is then automatically emailed to the person who requested the booking!
The same technique as is articulated in this blog could equally be leveraged to do the equivalent of a mail merge, whereby items in a SharePoint List with email contact details could be processed through dynamically generating a PDF document and then emailing each of those contacts in the list by simply starting a single flow.
Caught your interest yet ??
First let’s check out a demo of what this solution might look like.
Demo of App
Sadly building a demo app such as this one is most definitely nowhere near as awesome as actually going on the cruise ?.
Castonova Cruises is a real business located in Vilankulo, Mozambique. It ranks right up there with one the most beautiful places in the world I at least have been to, second only to Maldives. If you ever get an opportunity to visit, I highly recommend taking a cruise to the nearly Bazaruto Islands with great snorkeling, scuba diving and occasionally you’ll even pass by a pod of dolphins.
Platforms and Services Leveraged
Office 365 Services & Apps
- PowerApps
- SharePoint List
- SharePoint Document Library
- Microsoft Word (Document Template)
- Microsoft Flow
Power App
The app demonstrated in this blog is in fact very simple. It consists of a single screen that displays a gallery linked to a SharePoint Document Library.
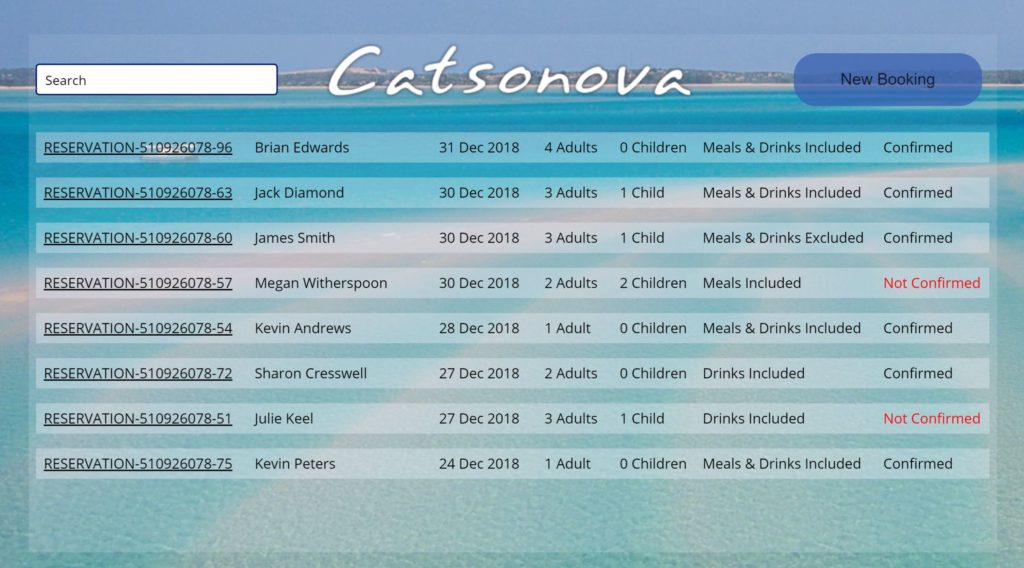
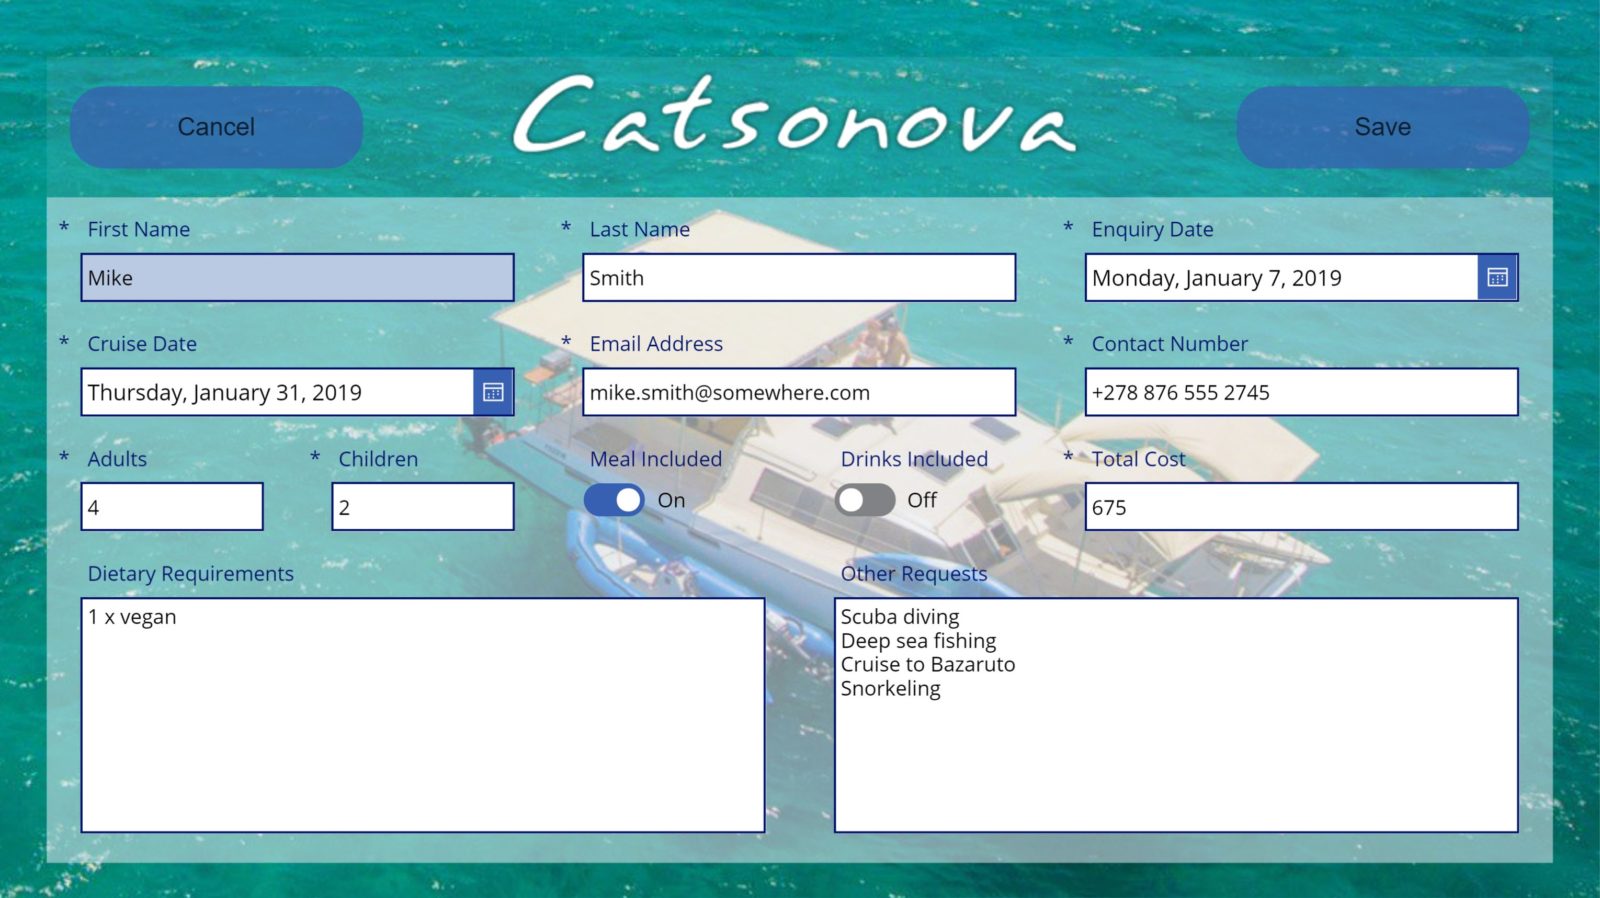
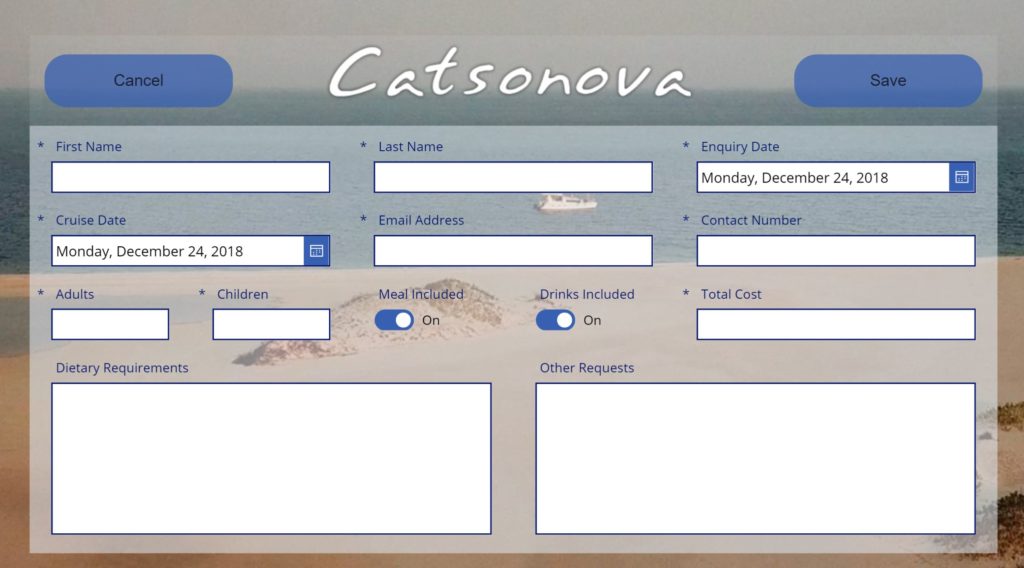
When the New Booking button is clicked on, the gallery control is hidden and a form linked to a List in SharePoint is displayed.
SharePoint List
The demo saves new bookings to a List in SharePoint which is in essence no more than a temporary “staging” container for the booking information that is easy to save to from Power Apps. As soon as a new bookings is saved to this list, a Flow triggers to generate the actual document which is saved to a document library, following which the list item created in PowerApps is then deleted in the Flow.
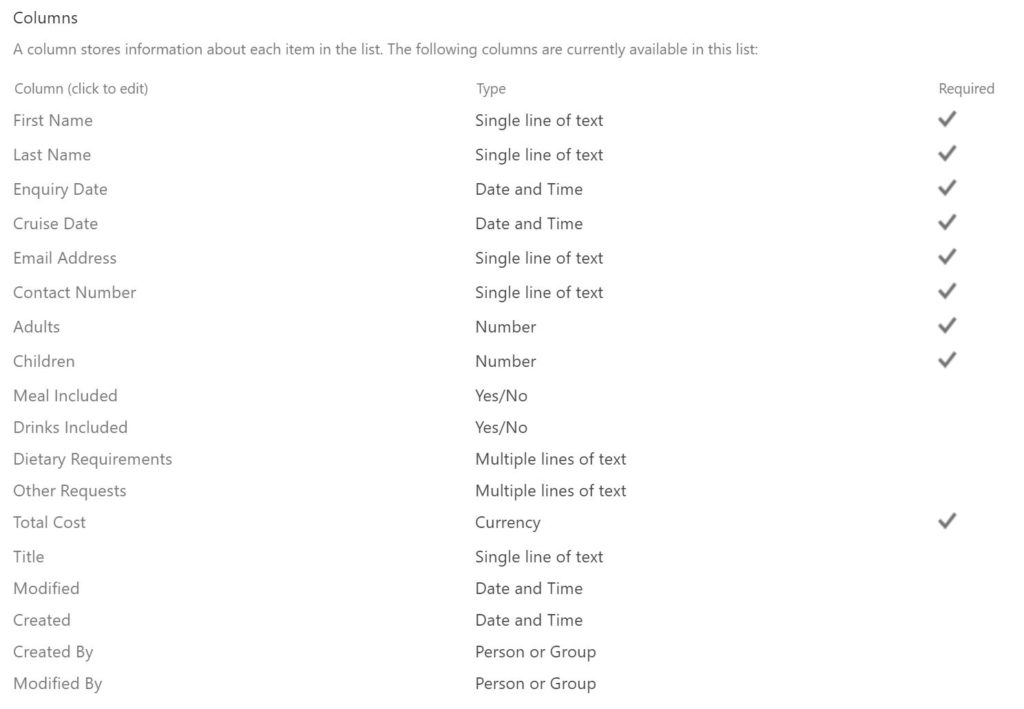
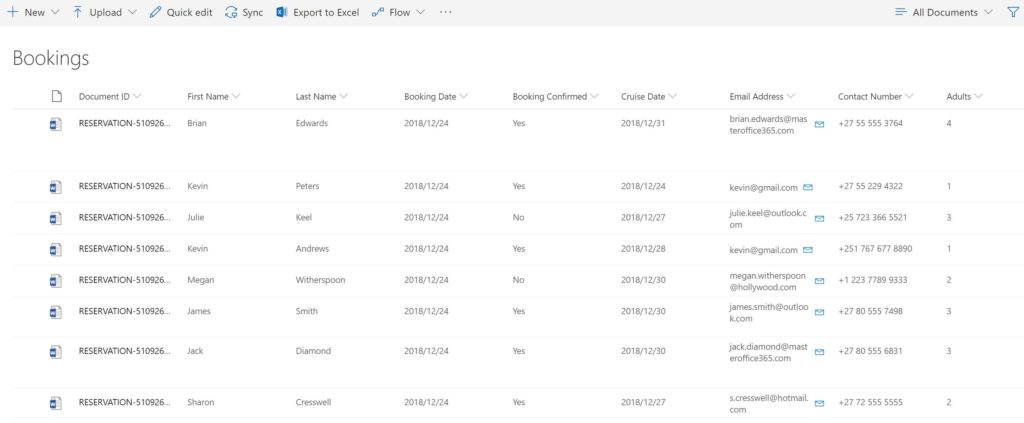
SharePoint Document Library
The Document Library in this demo solution contains the same set of metadata fields as the corresponding list contains. In this document library a “template” booking form document is copied to a new document when a new booking list item is saved, and the properties for the new document are updated with the values specified when the booking is saved in Power Apps. For this demo I activated the SharePoint Document ID feature in the site collection features, such that each new booking created would have a distinguishable booking reference, i.e. “RESERVATION-….“.
Microsoft Word Document Template
Insofar as this demo solution is concerned, the Microsoft Word document template is essentially a “report” template for the booking confirmation document that will be emailed to the person who placed the booking for a cruise.
This component is quite possibly the most complex part of the solution, so for the average Citizen Developer out there building this solution should be a piece of cake ?.
The key difference being that this demo at least is picking up booking information captured in PowerApps and saved to a SharePoint List, and equally hence why this solution could quite easily be considered a baseline pattern to leverage for implementing a mail merge solution.
How to build the Word document template
The Microsoft Word document template is by and large similar in nature to how you would create a document template for a mail merge to email out to a number of contacts typically from a corresponding Excel workbook.
Once you have created the SharePoint Document Library (including the metadata fields), you can create a blank document in Microsoft Word, upload it to that document library, following which download that same document back to your workstation.
The reason for doing is this is because the “blank” document you download from the document library will then allow you to utilize the metadata fields for placeholder values in the document whilst you modified that template document to look as so choose.
You can nonetheless equally start off with an existing document template of how you would like your booking form “report” to look and then upload it to the SharePoint document library and then download it back to your workstation (inclusive of the metadata fields) should that be your preference.
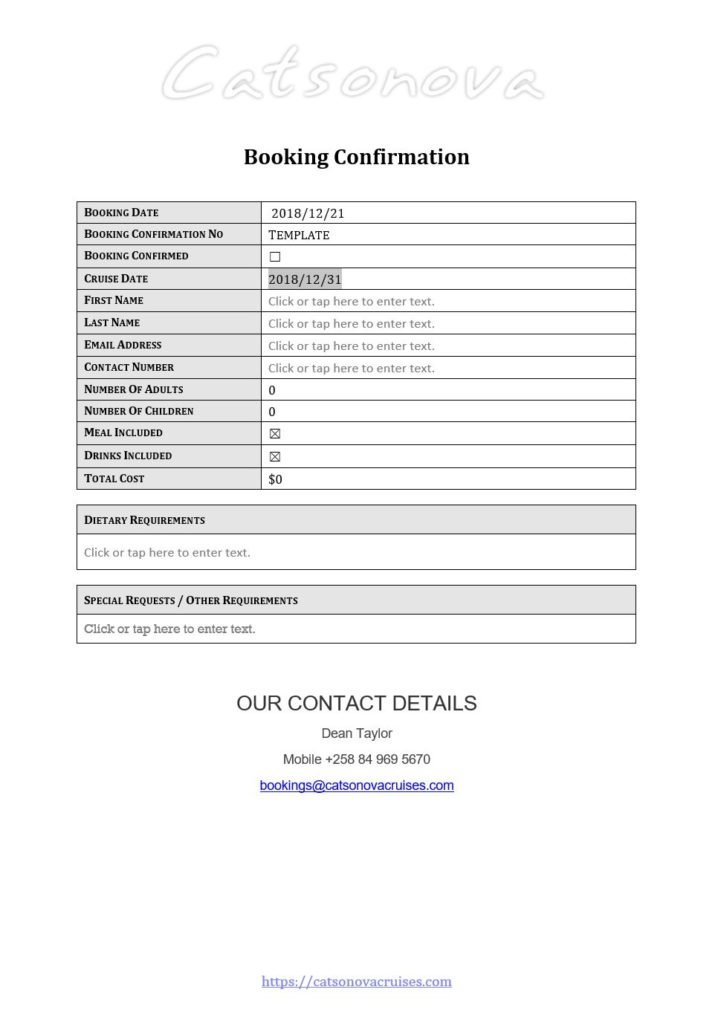
For this purposes of this blog, I am sharing the Microsoft Word template I created for the demo app such that you are able to see what an end-state booking template looks like:
One great benefit of this technique is that should you in future wish to modify the layout of the document template or perhaps add additional metadata fields, you can always modify the original template and override the previous template by simply uploading the updated template back into the SharePoint document library, replacing the previous one. No developer required!
Add Developer tab to the Ribbon in Microsoft Word
Before you can start customizing your template in Microsoft Word you will need to add the Developer tab to the Ribbon in Word. To add the Developer toolbar to the Ribbon in Word, right click in an empty space on the Ribbon and click “Customize the Ribbon…“.

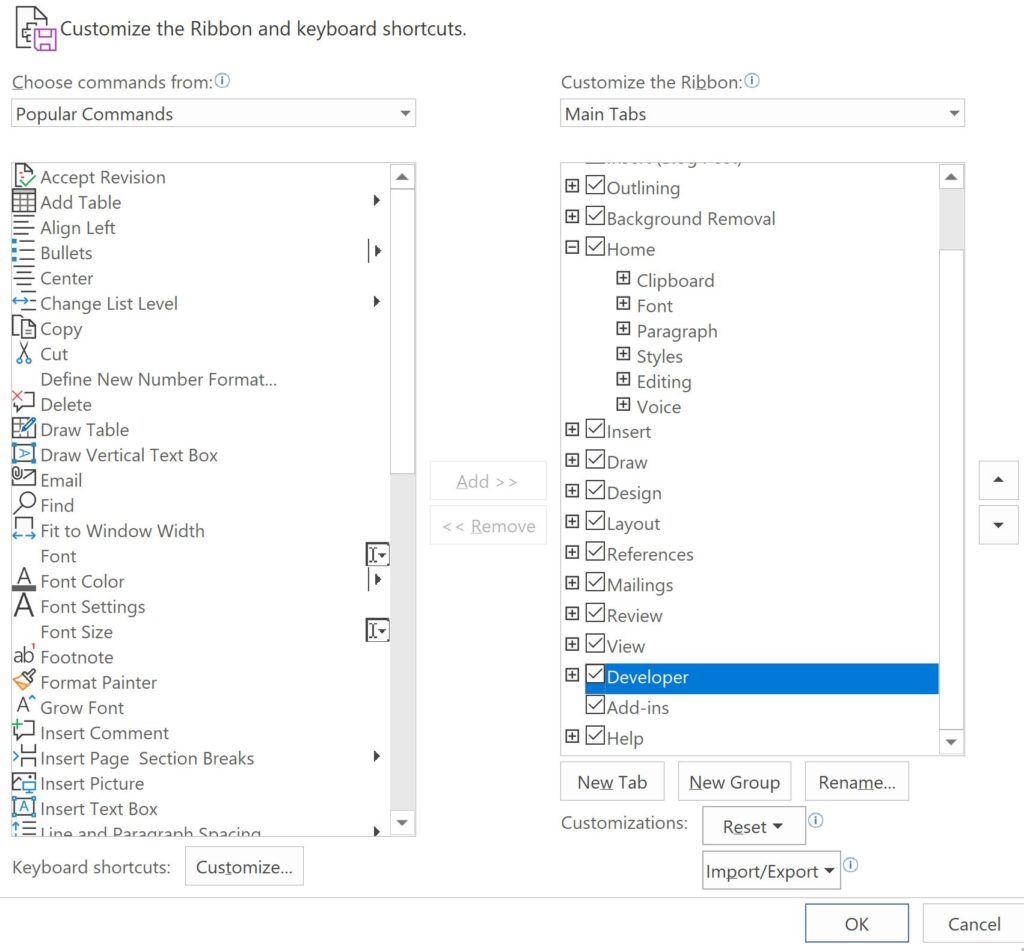
Once the Developer toolbar is added to the Ribbon you should be able to see the Developer tab that looks similar as follows:

Whilst there are certainly a lot of possible things you can do in the Developer tab on the ribbon, the only ones applicable to this demo app at least are as follows:
- Design Mode
- Properties (only enabled after you change to Design Mode)
- XML Mapping Pane
- Restrict Editing
Create Booking Form Template Document
Having added the Developer tab to the ribbon, you can then design your document template however you so choose.
For the booking form I used in this demo, the document template looks as follows:
Replace form fields with Content Controls
In your document template, where ever you would like fields captured in you app automatically populated in placeholders in your template document you will need to insert Content Controls / XMLNode Controls. As this is well documented by Microsoft, I won’t delve into too much detail on this, other than explaining by way of example how I implemented a couple in the demo template shared above.
Walkthrough: Create a template by using content controls
How to: Add XMLNode controls to Word documents
Albeit that the above link pertains to development using Visual Studio, the broader technique can equally be applied for this particular use case. Just ignore all the complex stuff in the above links ?.
For illustrative purposes lets look at how I added the following three content controls to the template document:

In the table row for “Booking Confirmed” click on the 2nd column where you’d like to insert a check box to indicate the booking has been confirmed.

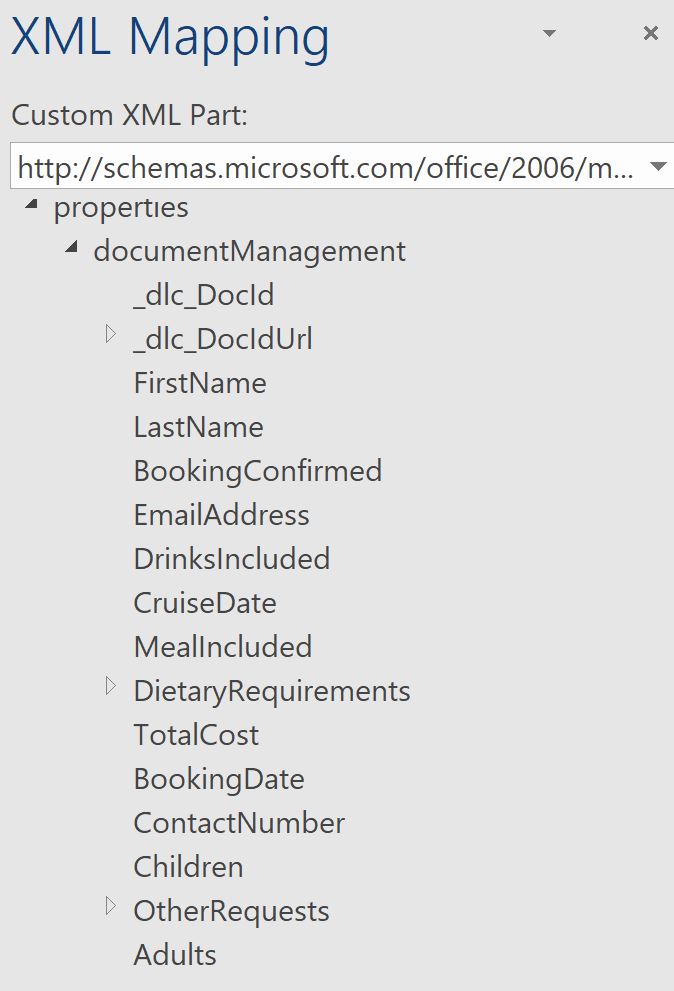
Next on the Developer tab on the Ribbon click “XML Mapping Pane“.
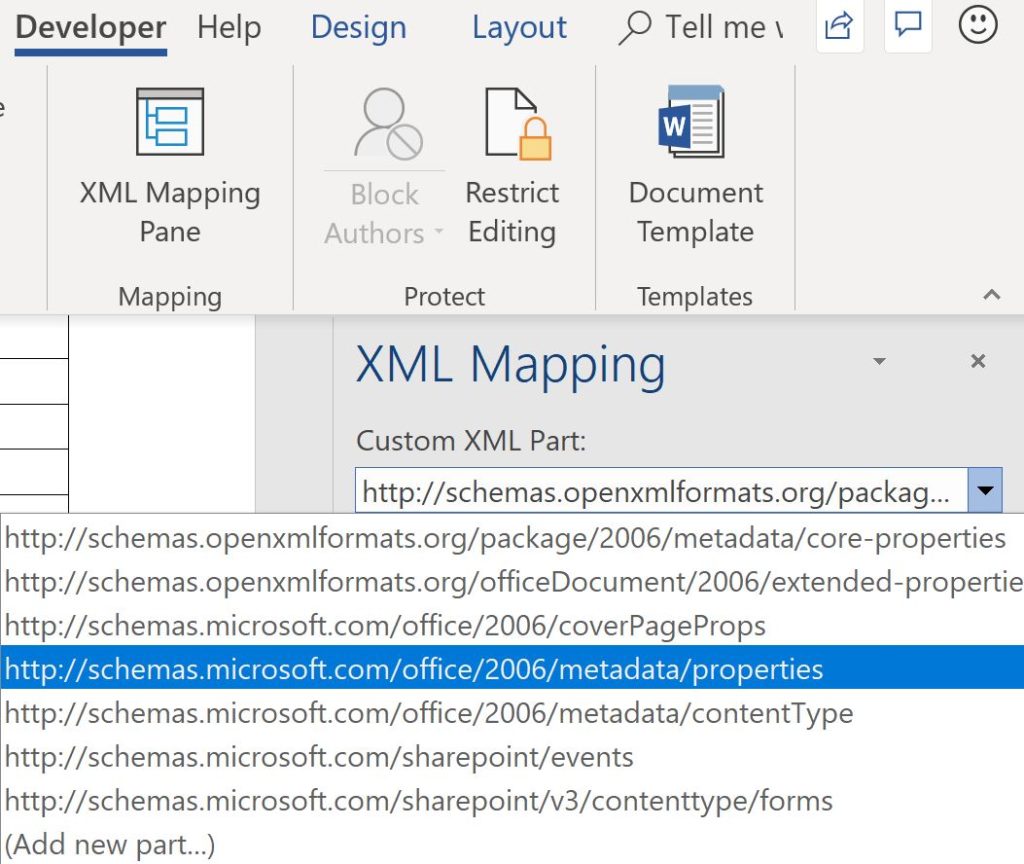
This will bring up a popup window with a dropdown list.
Select: http:/schemas.microsoft.com/office/2006/metadata/properties
Expand documentManagement in order to see all the available metadata properties per the corresponding SharePoint document library. For my form this looks as follows:
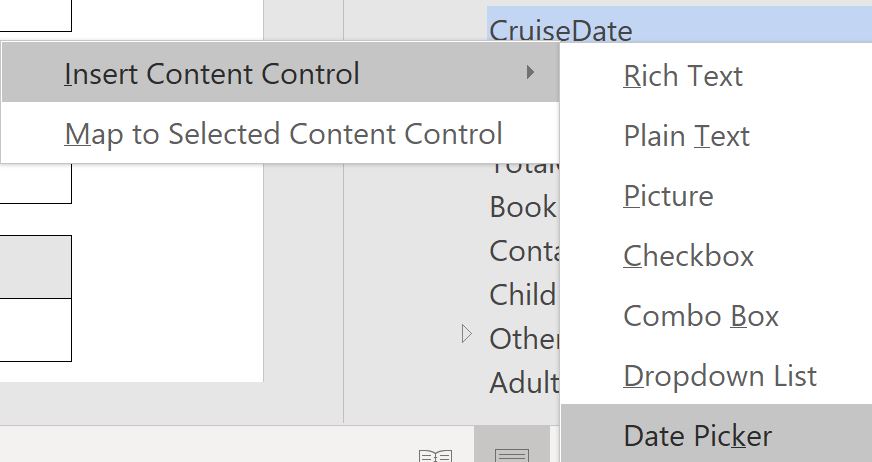
Right click on the field you want to insert as a placeholder. In this case I’d like to add a checkbox to reflect the value of the Booking Confirmed field.

Similarly do the same for the all the other fields such as Cruise Date and First Name:

Now that wasn’t so hard was it ?. Once you have finished mapping all the metadata properties and building your template, give your document a meaningful name and upload that back to the SharePoint Document Library. You’ll need to use the name of the template in the Flow detailed in the next step.
Bookings Flow
And now the final piece of the puzzle where the rest of the magic happens – the Flow that pulls it all together.
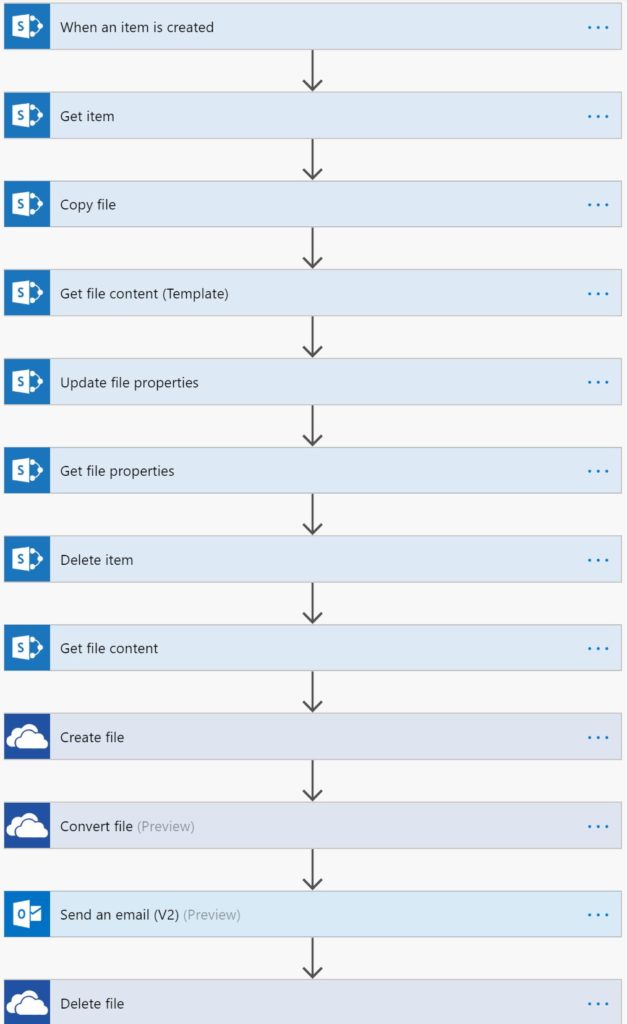
Looks relatively simple doesn’t it?
Well figuring out each of those steps isn’t that easy, however that’s why there are blogs such as this one to help you create it LOL!
Step 1 – When an item is created
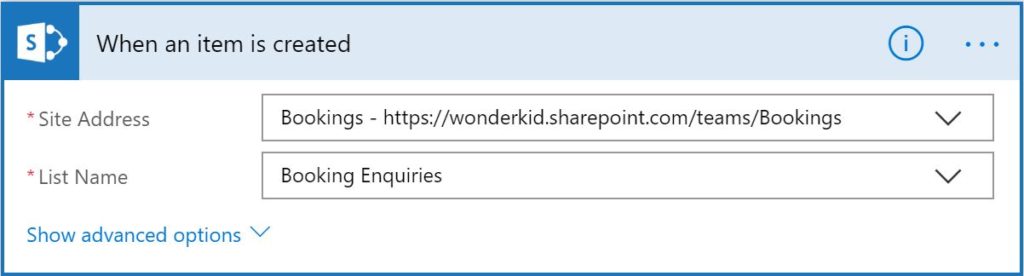
The first step in the follow is nothing more than creating a Flow that triggers when a new item is added to a list. In the demo app for this blog the list is called “Booking Enquires” located in a team site I called “Bookings“.
Step 2 – Get item
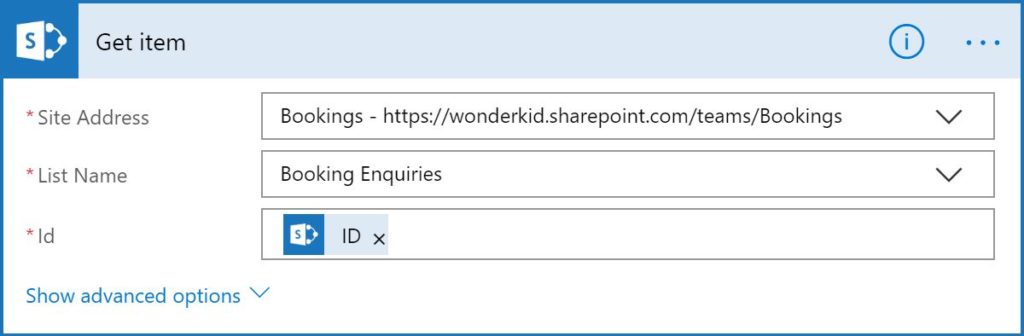
The 2nd step is again really simple. I used the “SharePoint – Get item” action to retrieve the metadata information for the item inserted into the Bookings Enquires list.
Step 3 – Copy file
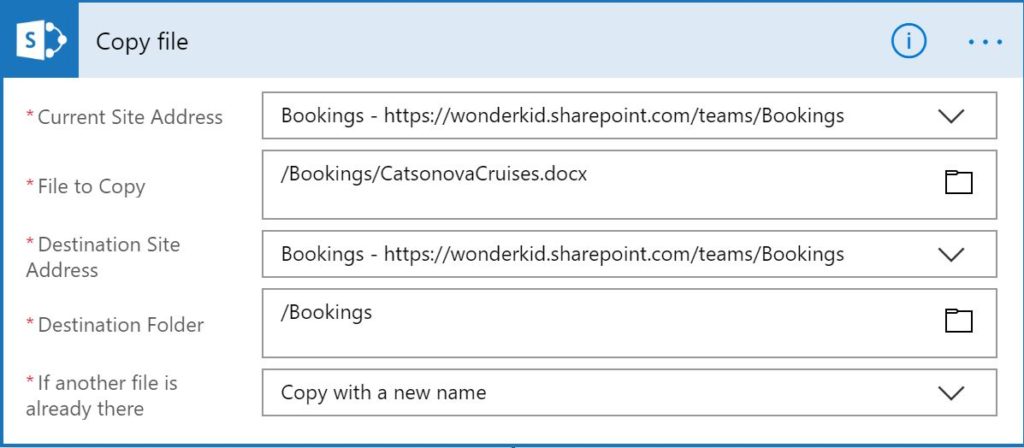
In the 3rd step in the flow I used the “SharePoint – Copy file” action to make a copy of the template document we’ve set up in a SharePoint document library I named “Bookings“. Wow isn’t this easy?
Step 4 – Update file properties
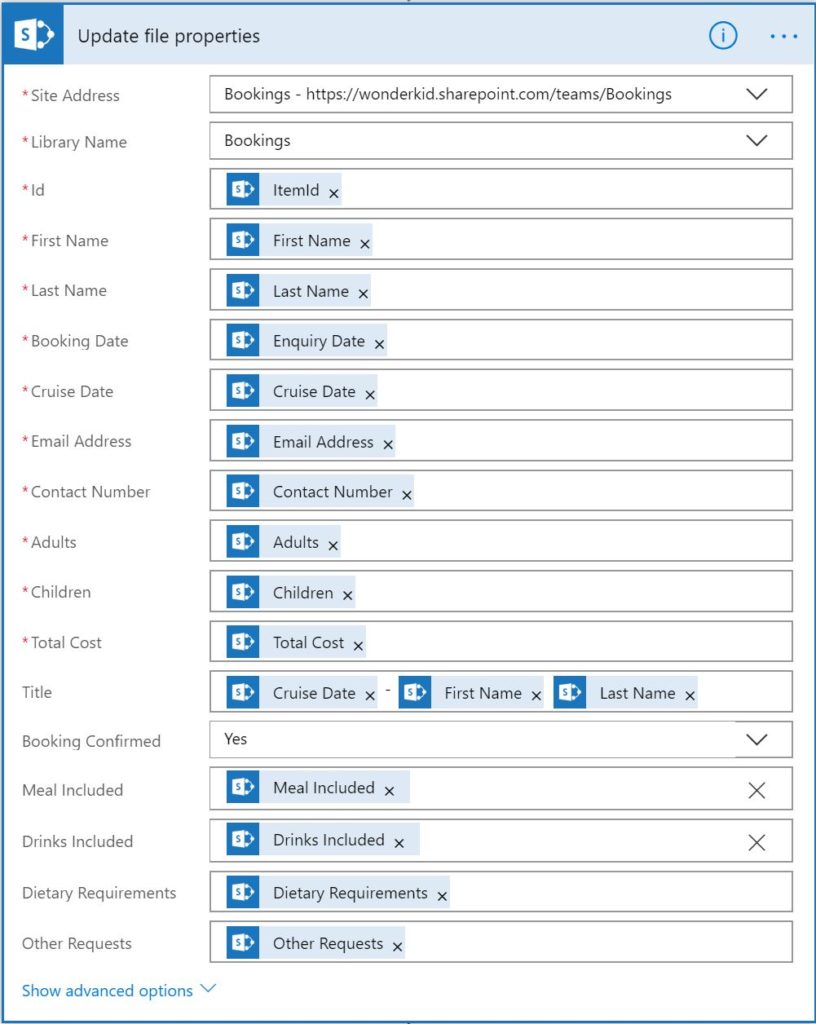
In the 4th step in the Flow I update the metadata properties for the template document I made a copy of in the 3rd step with the corresponding metadata column values as was saved as a new item into the “Booking Enquires” list.
Step 5 – Get file properties
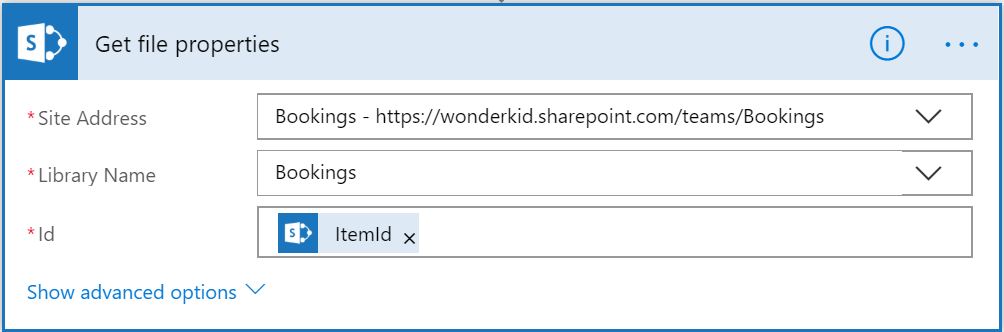
In the 5th step in this Flow I call the “SharePoint – Get file properties” action.
The primary reason for including this step in the Flow is to obtain the unique “Document ID” value (aka “OData__dlc_DocId“) for the copy of the template file copied, such that we can share a more meaningful reference number, referred to as the Reservation Number, later in Step 8 and again in Step 10 of the Flow in the email we send to the person who placed the booking.
Step 6 – Delete Item
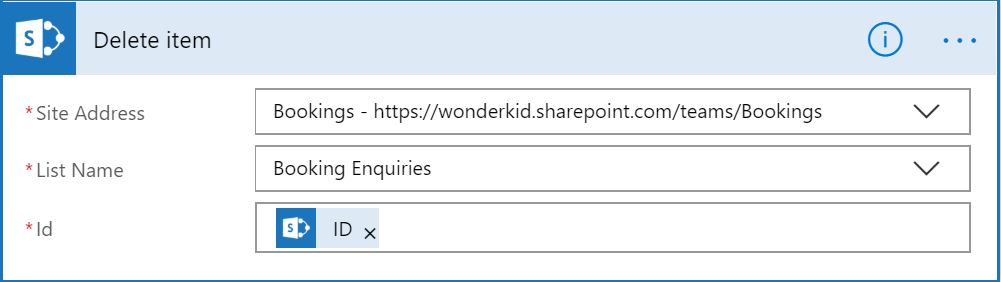
As we no longer need the list item created that initially triggered this flow, in this step in the Flow the new list item can be deleted. This is optional and not essential for the purposes of the overall demo solution.
Step 7 – Get file content
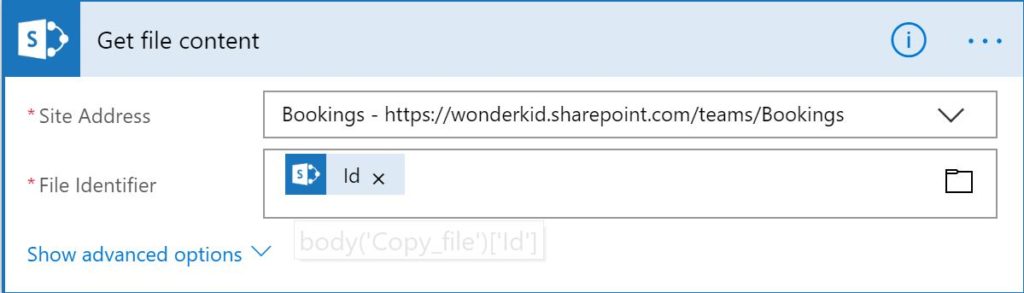
Now that we have populated the metadata fields (“Step 4“) for the new file we copied from our template document (“Step 3“), we can now copy the completed Word document elsewhere, in this case OneDrive for Business.
The reason for doing this is because a new action (in Preview) available in OneDrive for Business (“ODFB”) enables you to convert documents to PDF format and currently at least this action is not available for documents stored in SharePoint.
As there is no action in Flow to directly copy documents from SharePoint to ODFB (again currently at least), in this step I have used the “SharePoint – Get file content” action such that in the following step I can create a new document in ODFB, following which we can then convert that document to a PDF document…
Step 8 – Create file
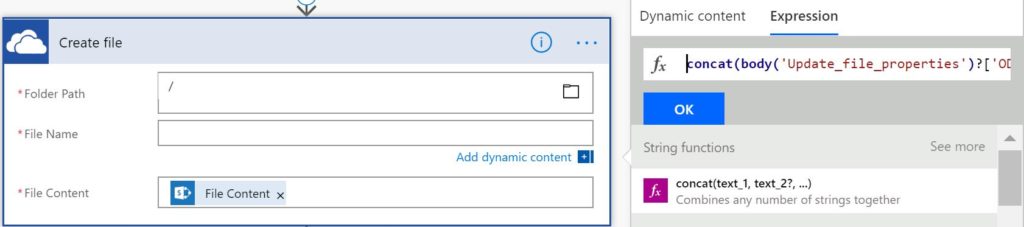
Here I use the “One Drive for Business – Create file” action to emulate copying the file from SharePoint to ODFB using the file content from the previous step in the Flow. For the File Name I use the unique Document ID from “Step 5” for the file name & appending “.docx” to the value of the Document ID property.
concat(body('Update_file_properties')?['OData__dlc_DocId'],'.docx')Step 9 – Convert file (Preview)
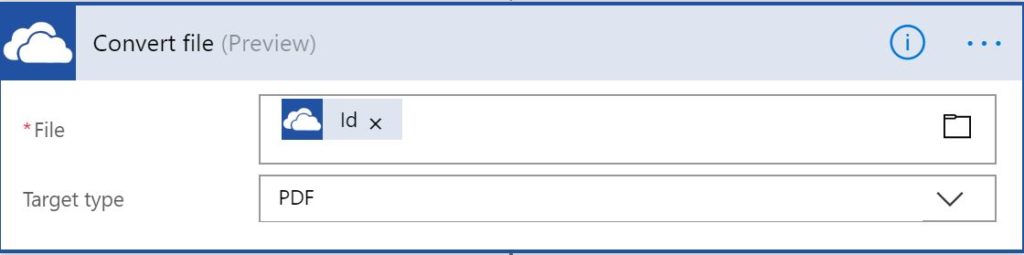
In this step I added an action “One Drive for Business – Convert file” which enables us to convert our now complete Word document to a PDF document, which most people would prefer to email a document such as the Booking Confirmation.
I must at this give a SHOUT OUT ? to Shane Young for the video he posted on YouTube “PowerApps PDF Generator using Microsoft Flow PDF Converter” as I recently viewed his video, and quickly realized that leveraging native functionality to convert document to PDF would most certainly be a recommended approach over other techniques I have early blogged on.
Step 10 – Send an email (V2) (Preview)
At this point we now have all the content and information to send the Booking Confirmation email. I used the “Office 365 – Send an email (V2)” (preview) action to send that email along with a Booking Confirmation PDF document to the person who placed the booking.
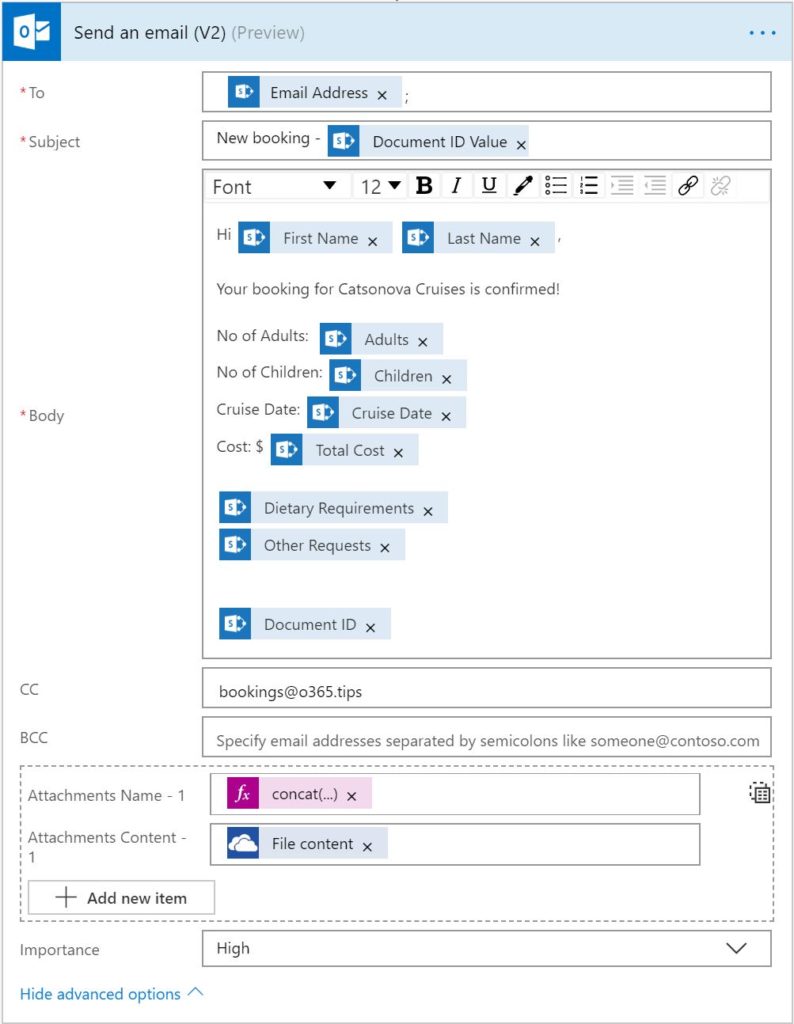
The code in the “Attachment Name – 1” is:
concat(body('Update_file_properties')?['OData__dlc_DocId'],'.pdf')The “Attachment Content – 1” – “File content” is the output returned from the previous step in the Flow.
Step 11 – Delete file

In the final step in the Flow I delete the file “copied” to ODFB as we no longer need this.
That’s it – we’re done!
Mobile Version Demo
With just a little additional work, once you done all the other work it shouldn’t take you too much more time to create of mobile version of your app ?.
Wrapping Up
Personally I think it is pretty awesome what can be achieved with the combination of Office 365, PowerApps and Flow nowadays. Feel free to share your comments and thoughts on this solution as I am always interested in hearing other viewpoints!
Merry Christmas to ya all.
Hi Brian,
This is a great article! i spend most of my days this past month doing nothing but trying to learn PowerApps. Currently, I am working on some large scale projects for storing Policies and Procedures and being able to start with one department first. My plan is to have a first filter screen by Division catalog and then to the available policy or procedures which can also be searchable. Being able to see what you have done, including your next blog post I believe I can achieve this. If you would have any suggestions for me I would greatly appreciate them.
Thank you,
John
Very, very helpful – much obliged for sharing all that.
Quick question – I’m having trouble identifying the right XML fields for “Choice” site columns with the “Display choice” option set to “Checkboxes (allow multiple selections).”
And none of my Choice-type columns appear as Quick Parts in Word’s document properties either, so I’m stuck.
Have you tried (or have any suggestions for) using XML mapping for that kind of column type?
Thanks again and much obliged for any and all feedback!
Cheers,
Adrian.
Hi Brian,
Very good article. I’m beginner user of MS365 (sharepoint + power apps + flows).
I wanted use Your flow, but during step 3 flow fail because:
{
“status”: 400,
“message”: “The destination path cannot be the same as the source object itself.\r\nclientRequestId: 310e3bb6-530b-4ddd-8c4b-4dcfb7014efa\r\nserviceRequestId: 310e3bb6-530b-4ddd-8c4b-4dcfb7014efa”
} Do You have any idea how to deal with this ? I tried to change folders but then fails in step 7. Would be really grateful if You would find a bit of time to help. many thanks,
Anna
I’m having the same problem as you.
Awesome article! thks so much, it is what I needed. Just meant to ask you, can you tell me which Microsoft Plan should I buy to have all these? or what the cost aprox is? thks!!
Can you make a post on how you made the PowerApps app and the Sharepoint library (or list?) in relation to it? If you have, I can”t find the link for it. I have attempted to make a PowerApps app, pulling the metadata from the columns in the Sharepoint library I created, but when I create a submit button, I get the error, “Invocation of unknown or unsupported function.” For OnSelect for the submit button, I have “Submit(Form1);NewForm(Form1)”
I haven’t worked with this code for some time however with regards to this comment (and the others), I will try put aside some time in the coming week and see if there is any additional insight I can share that may help you…
I somewhat figured things out. I had to create both a Sharepoint List AND a Sharepoint Document Library. I followed your directions exactly, and when I submit the fields in my PowerApp, it adds them to my Sharepoint List and successfully triggers a flow… but the problem now is that it gets stuck at Copy File, and the error is “The destination path cannot be the same as the source object itself.” I don’t understand. Mine looks exactly like yours. Current Site Address is my main Sharepoint site (where the List and the Document library is), File to Copy is the .docx that is in the Document Library I created, Destination Site Address is the main Sharepoint site (again), and Destination Folder is my Document Library within that site. That’s how your step 3 looks. What am I doing wrong?