I have since significantly enhanced the Power Automate flow as is articulated in this blog and equally shared a new Power App.
Check out my latest blog it greatly simplifies surfacing EXIF metadata from photos plus a whole lot more awesomeness ?.
In this latest feature I have implemented in this awesome PowerApp I previously showcased in an earlier blog a few weeks ago. In this blog I have added a touch more genius to that app and things start get a really exciting ?.
On the Microsoft Support web site, you’ll find some guidance insofar as how to Set up an Asset Library to store image, audio, or video files. Per this page, one of the features of an Asset Library states to quote:
Automatic metadata extraction for image files When you upload image files to an Asset Library, any existing metadata for the file is extracted and promoted to any available corresponding columns in the library. Automatic metadata extraction is supported for the following image file types: BMP, GIF, ICO, JPEG, PNG, and TIFF.
Naturally Microsoft quite frequently like to change things like this, deprecated some functionality here and there, and then reimplementing that same functionality in some or other product that unsurprisingly infuriates many users, by example:
Bring back SharePoint Online Image Metadata Extraction
That isn’t so cool. Microsoft deprecated that specific out-the-box functionality, so where did they thus move it to? Seemingly to Azure Cognitive Services Computer Vision.
Azure’s Computer Vision API does a whole lot of other stuff such as analyzing images to detect and provide insights about their visual features and characteristics provide by the Analyze Image API. As such, this blog most certainly does not speaks to all the functionality and content surfaced by the Cognitive Services Computer Vision API.
If in fact it actually even possible to actually do something quite similar using the Computer Vision API, seemingly Simon Hudson figured out how to accomplish it earlier this year. Even then Simon gave very well deserved credit to John Liu.
Well done guys, because between those 2 blogs I don’t even think I could have come close to figuring out some of the really fantastic code , and that’s coming from a MCSM Charter SharePoint ? . Check out Simon and John’s own blogs on this topic because they have set the benchmark wrt this particular topic ?:
- Simon: Auto-Classify Images in SharePoint Online Library – an epic Real-World Flow
- John: Auto-Classify Images in SharePoint Online library via Flow for Free
Either way, it certainly “used” to be possible to extract EXIF metadata information such as Location data as well as the Photo Date Taken etc.
Seemingly at least at least as of mid December 2019 EXIF metadata was in fact still being extracted from content uploaded to SharePoint. This metadata can be surfaced using the RenderListDataAsStream API.
This blog at least should hopefully be useful for many people caught off guard when Microsoft deprecated this functionality automatically within SharePoint Online.
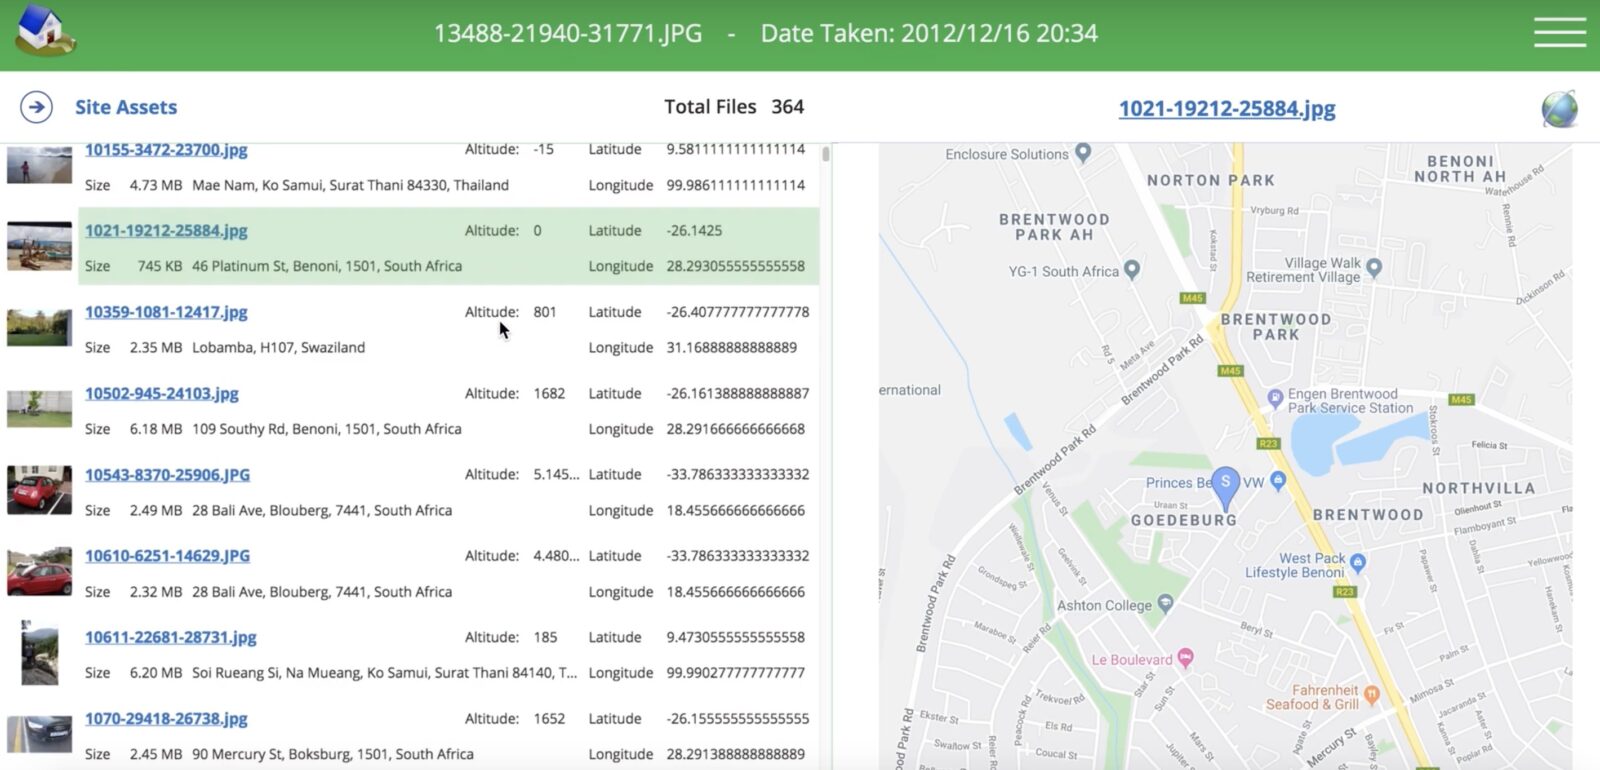
The type of throughput I have been able to successfully test with the flow I am sharing in this blog in concerned, in order to extract EXIF metadata data properties including the Longitude, Latitude, Altitude, Address, Basic Tags (outdoor / indoor / person), ThumbnailUrl, Camera Make, Model all within a single flow containing less than 10 steps in total, half of which are simply initializing and setting variables comes to a whooping 45-60 seconds on average per 5000 photos processed from a Site Assets Library containing over 10k of photos.
Power Apps & SharePoint Demos with EXIF Image Metadata Extraction
PA_RenderListDataAsStream_GeoLocation Power Automate Flow
As I alluded to earlier in this blog, all the EXIF metadata surfaced in the demo app has been made possible using by all accounts a simple Power Automate flow. In fact actually extracts significantly more EXIF metadata then I’ve showcased in the demo app showcased in this blog.
As I am in any case sharing a link to download the flow as is described in this blog, and equally in the interests of “my” own time currently, I am primarily going to focus on the particular steps in the flow that are of most significance.
Overview

Did I mention the flow was relatively simple, I forget ?.
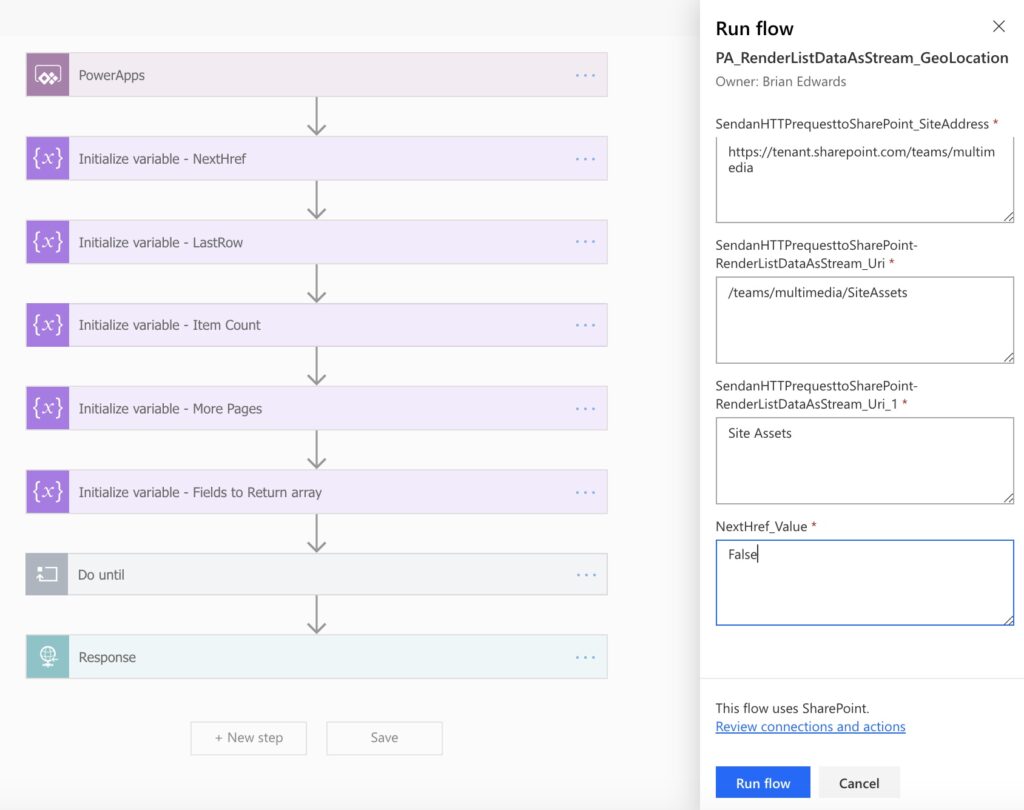
In order instantiate this flow from PowerApps, you’ll need to pass 4 input parameter to the flow, those being:
| Parameter Name | Purpose | Examples |
| triggerBody()[‘SendanHTTPrequesttoSharePoint_SiteAddress’] | URL to Site or Subsite | https://tenant.sharepoint.com/teams/multimedia https://tenant.sharepoint.com/teams/multimedia/masteroffice365 |
| triggerBody()[‘SendanHTTPrequesttoSharePoint-RenderListDataAsStream_Uri’] | Relative path to Document Library and subfolders if desired | /teams/multimedia/masteroffice365/Videos /teams/multimedia/masteroffice365/SiteAssets /teams/multimedia/Shared Documents /teams/multimedia/Personal Memories/GEO Mapped Photos |
| triggerBody()[‘SendanHTTPrequesttoSharePoint-RenderListDataAsStream_Uri_1’] | Document Library Name | Videos Site Assets Documents Personal Memories |
| triggerBody()[‘NextHref_Value’] | For paging . will explain later! | false |
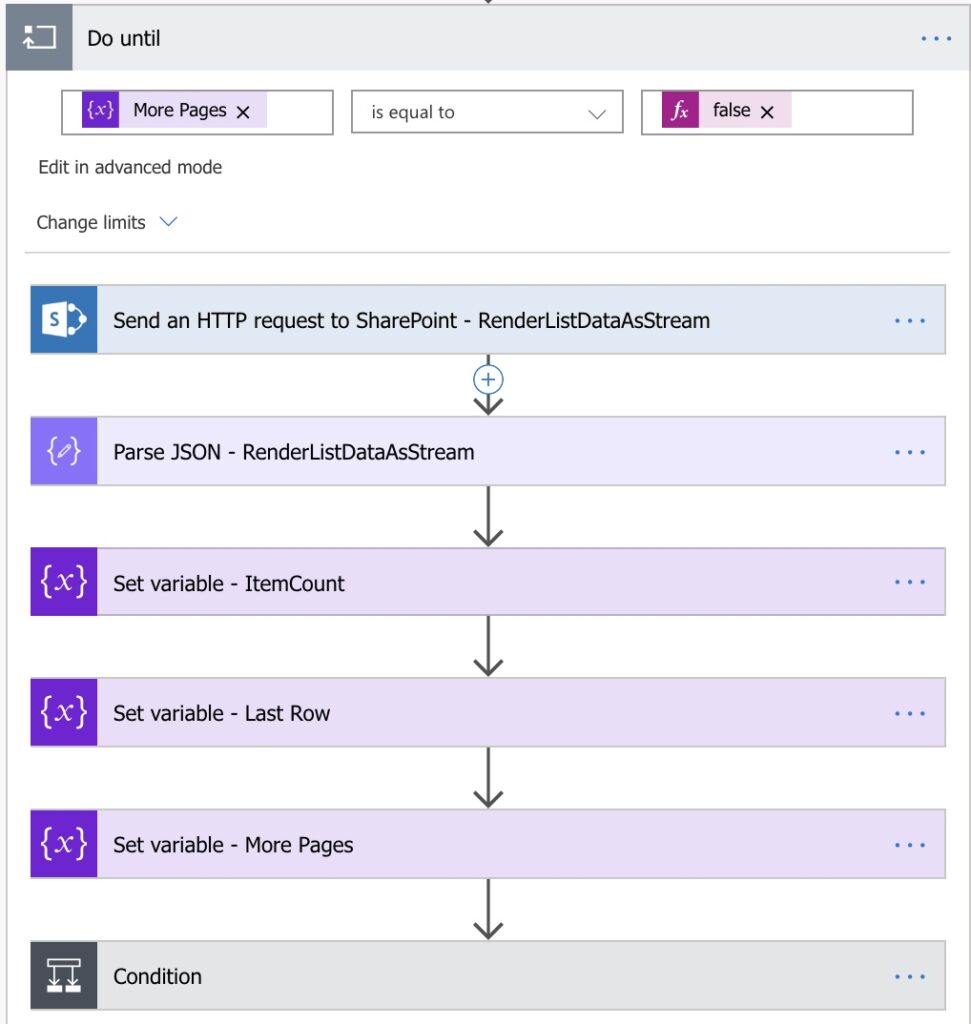
Do Until Loop

The Do Until loop per the Power Automate flow shared in this blog will only run through each step once, and not actually loop through each page of results returned by the Send an HTTP request to SharePoint – RenderListDataAsStream step in the flow. The reason being is that the Send an HTTP request to SharePoint – RenderListDataAsStream step in the flow will return as many as 5000 rows from the Document Library being queried.
Based upon the testing I have done querying a Site Assets Library containing 10k photos, to query the RenderListDataAsStream API specifying a page size of 5000 rows typically takes approximately 45 seconds to complete.
When attempting to retrieve the 2nd page of 5000 rows in the same flow run, the average time the flow run typically takes to complete increases to approximately 2 minutes. From a Power Apps web browser session, the maximum timeout Power Apps will wait for the result set returned by a flow run is seemingly 120 seconds. Accordingly if the flow is configured to, for example, return up to 10k in any given flow run, approximately 50% of the time the Power Apps session will time out.
Accordingly for the Power Automate flow shared, the Do Until loop is hard-coded to in effect only loop through the steps in this action once.
The reason for nonetheless incorporating a Do Until loop in the flow shared is such that should your requirements alternatively be to, for example, run the flow on a scheduled basis and not directly from a Power App, with minor modifications to the flow you could alternatively configure the flow to loop through the entire contents of any given Document Library in a single flow run, even if that Document Library contained, for example, 100k of photos, if not more.
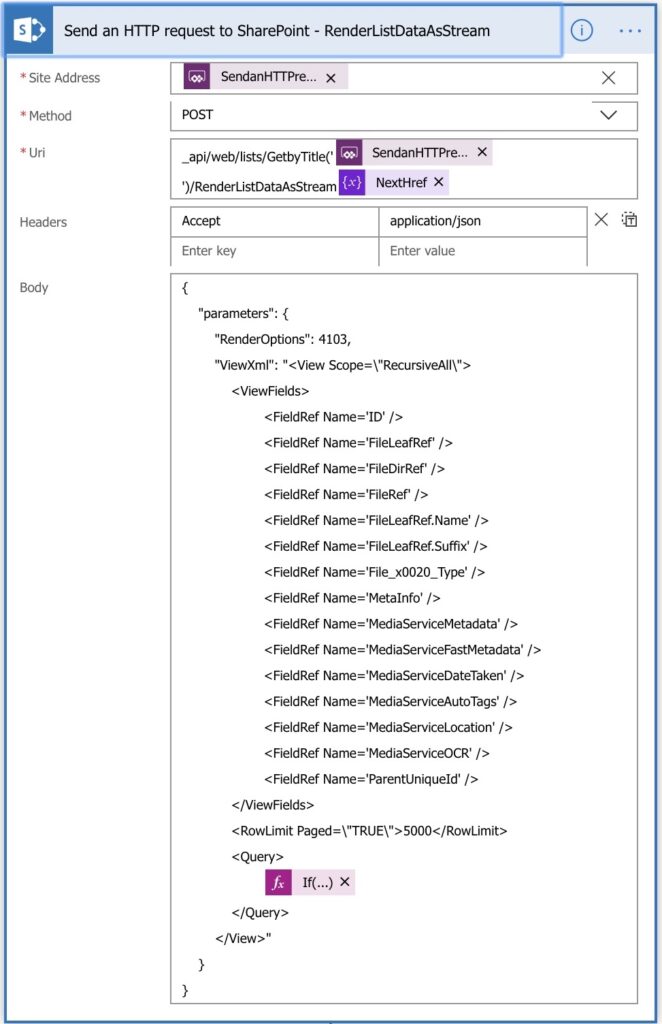
Send an HTTP request to SharePoint – RenderListDataAsStream

| Property | Expression | Examples |
| Site Address | triggerBody()[‘SendanHTTPrequesttoSharePoint_SiteAddress’] | https://tenant.sharepoint.com/teams/multimedia https://tenant.sharepoint.com/teams/multimedia/masteroffice365 |
| Uri | _api/web/lists/GetbyTitle(‘triggerBody()[‘SendanHTTPrequesttoSharePoint-RenderListDataAsStream_Uri_1′]’)/RenderListDataAsStream± | _api/web/lists/GetbyTitle(‘Videos’)/RenderListDataAsStream _api/web/lists/GetbyTitle(‘Site Assets’)/RenderListDataAsStream _api/web/lists/GetbyTitle(‘Documents’)/RenderListDataAsStream |
| Headers | Key: Accept Value: application/json | Key: Accept Value: application/json |
| Body | _api/web/lists/GetbyTitle(‘triggerBody()[‘SendanHTTPrequesttoSharePoint-RenderListDataAsStream_Uri_1′]’)/RenderListDataAsStream | { “parameters”: { “RenderOptions”: 4103, “ViewXml”: “<View Scope=\”RecursiveAll\”> <ViewFields> <FieldRef Name=’ID’ /> <FieldRef Name=’FileLeafRef’ /> <FieldRef Name=’FileDirRef’ /> <FieldRef Name=’FileRef’ /> <FieldRef Name=’FileLeafRef.Name’ /> <FieldRef Name=’FileLeafRef.Suffix’ /> <FieldRef Name=’File_x0020_Type’ /> <FieldRef Name=’MetaInfo’ /> <FieldRef Name=’MetaInfo.’ /> <FieldRef Name=’MediaServiceMetadata’ /> <FieldRef Name=’MediaServiceFastMetadata’ /> <FieldRef Name=’MediaServiceDateTaken’ /> <FieldRef Name=’MediaServiceAutoTags’ /> <FieldRef Name=’MediaServiceLocation’ /> <FieldRef Name=’MediaServiceOCR’ /> <FieldRef Name=’ParentUniqueId’ /> </ViewFields> <RowLimit Paged=\”TRUE\”>5000</RowLimit> </View>” } } |
The Send an HTTP request to SharePoint – RenderListDataAsStream step in the flow queries the RenderListDataAsStream API which in turn returns a result set of up to 5000 rows containing a collection of files in the Document Library being queried, exposing the EXIF metadata for various file types such as photos and videos files.
The EXIF metadata fields of particular interest for this blog include:
<FieldRef Name='MetaInfo.' />
<FieldRef Name='MetaInfo' />
<FieldRef Name='MediaServiceMetadata' />
<FieldRef Name='MediaServiceFastMetadata' />
<FieldRef Name='MediaServiceDateTaken' />
<FieldRef Name='MediaServiceAutoTags' />
<FieldRef Name='MediaServiceLocation' />
Now what?
Simply import the Power Automate flow shared below.
By all means contact me should you require assistance with any of your own requirements.
Download the Power Automate flow
Download the Power Apps & SharePoint Demo with EXIF Image Metadata Extraction Power Automate Flow template.

Hi,
I created a site assets library, I uploaded some pictures that I know have GPS data. I then downloaded your Flow and imported it to my account. I ran it giving the parameters expected. I see when it runs that it scans those files but it will not give me GPS data.
Is there something I’m missing?
I published a two new blogs on this same topic with much more functionality for that matter that should make everything a lot clearer. Check it out and let me know if that helps you as I have shared both the Power App and the Power Automate flow in this latest blog.
https://masteroffice365.com/media-service-metadata-part-1/
https://masteroffice365.com/media-service-metadata-part-2/
Hi Patricio,
There is a space in each of the Expressions after item()?[‘MetaInfo.’], in the ‘Select – Fields to Return’ actions. This occurs multiple times in each of the GPS expressions
Removing this will resolve your issue as I had experienced the same.
Oops 🙂
Will fix it shortly and update it in the GitHub repository.
In a subsequently blog (or two!), I significantly cleaned up and improved the flow, and equally articulated an alternate technique using the SharePoint Graph V2 APIs to accomplish pretty much the same thing. I’d recommend checking out the now updated and greatly simplified version of the PowerApp and flow. The PowerApp is primarily to showcase how the flow could be consumed in an app, however the app is equally not required.
https://masteroffice365.com/media-service-metadata-magic-part-2/
Great thanks for this post.
I used your referenced flow as a basis for mine which runs on a schedule on a Global Asset Image library. No PowerApp needed.
It extracts the relevant Geo location data out of the images and updates each file in the library with the relevant data.
I used an EXIF processed flag to filter images to be processed and then set this flag.
In your attached flow there was an issue where there are space characters in the split logic that I had to remove to get working in each of the “Select – Fields to Return” Mapping expressions.
i.e. split(item()?[‘MetaInfo.’], ‘”latitude”‘)),’,’) has a space after Info.’],
Took a while to find that throughout the strings 🙂
Thanks again.
Thanks for this post.
I have also a blog on how to achiev this with a SharePoint Add-In.
If necessary I can also provide you with some further useful information on my SharePoint blog.
https://www.smarterbusiness.at/en/export-metadata-from-images-to-sharepoint-image-library
I hope this is helpful for someone. For additional information do not hesitate to contact me.
https://www.smarterbusiness.at/en/contact