Several months ago I posted a blog detailing a technique that could be used to extract EXIF metadata from photos stored in a SharePoint library. In my previous blog on this topic the use case I articulated specifically spoke to extracting EXIF metadata embedded within photos stored in a SharePoint Site Assets Library leveraging the SharePoint RenderListDataAsStream REST API.
Subsequent to publishing my earlier blog and having now spent more time exploring interesting ways to surface otherwise hidden metadata pertaining to not only EXIF metadata embedded within photos but equally additional metadata generated for numerous other type of files uploaded to different types of SharePoint Libraries.
As it turns there is some really awesome additional metadata that can in fact be surfaced that speaks to numerous other potential use cases. Furthermore near identical metadata pertaining to any given file uploaded to SharePoint is generated for that file regardless of the type of library the file is uploaded to.
In Part 2 of this series even more kewl stuff will be shared… How long it takes for me to publish the next part in this series depends on how many likes on YouTube I get for the 2 demo videos ?.
Power Apps MSM Demo – RenderListDataAsStream API
Solution Components
SharePoint Team Site and Libraries
For the demo as showcased in this blog a SharePoint team site was created. If you are following this blog in order to reproduce similar results I recommend you set up a test team site for your own testing as follows:
In addition to the standard Documents Library and Site Assets Library automatically provisioned, a Picture Library and an Assets Library were added to the site. Assets libraries are not always available to sites so don’t stress if you can’t find where or how to add one as it’s not important. A collection of 15 files of different types were uploaded to each of the libraries.
- Create a new Team site in SharePoint. In the new Team site a Documents Library and a Site Assets Library will automatically be provisioned. No changes to either of these 2 libraries are necessary.
- Create a new Pictures Library and a new Assets Library on the site.
To do this navigate to Site Contents > New > App
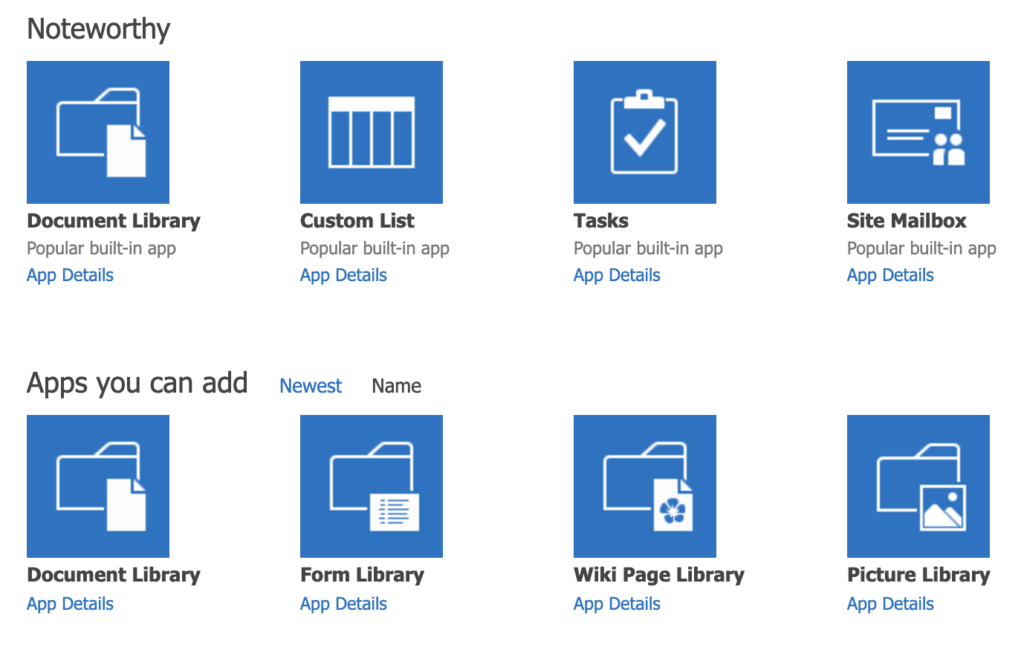
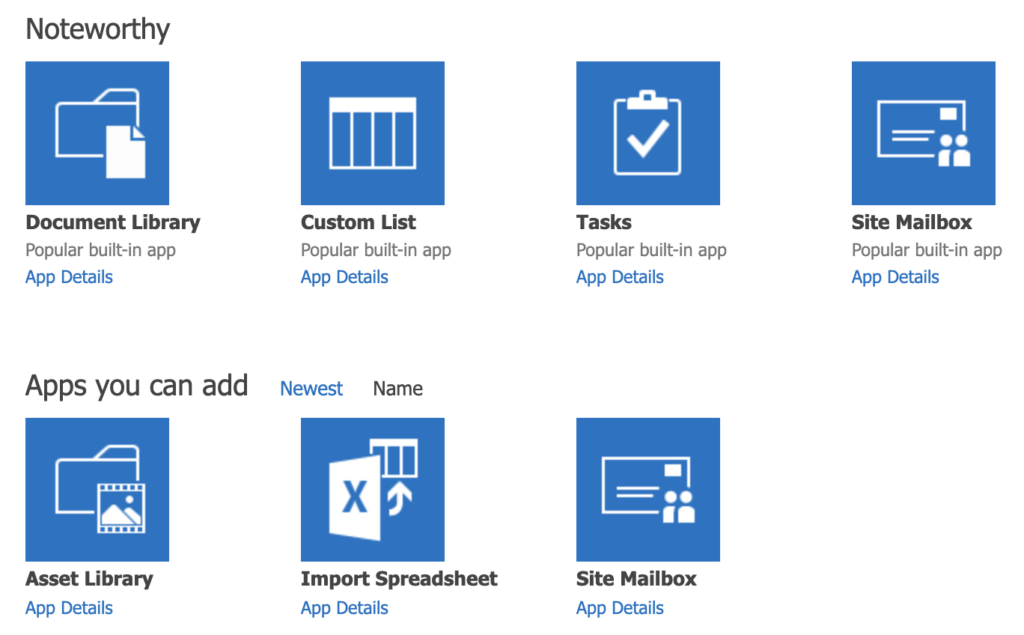
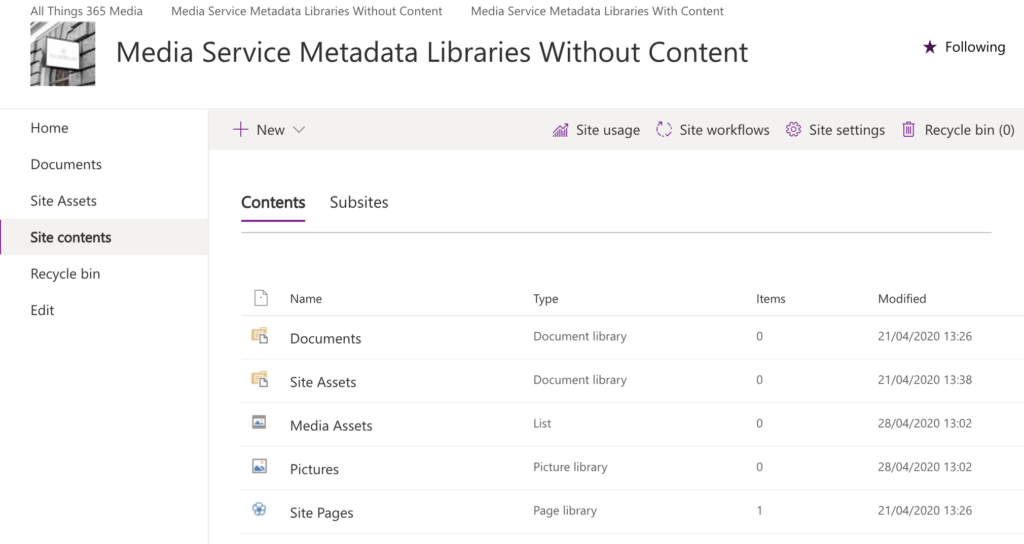
Having provisioned your new team site and created the two additional libraries, when viewing the Site Contents page on your site it should look similar to the screenshot depicted here.
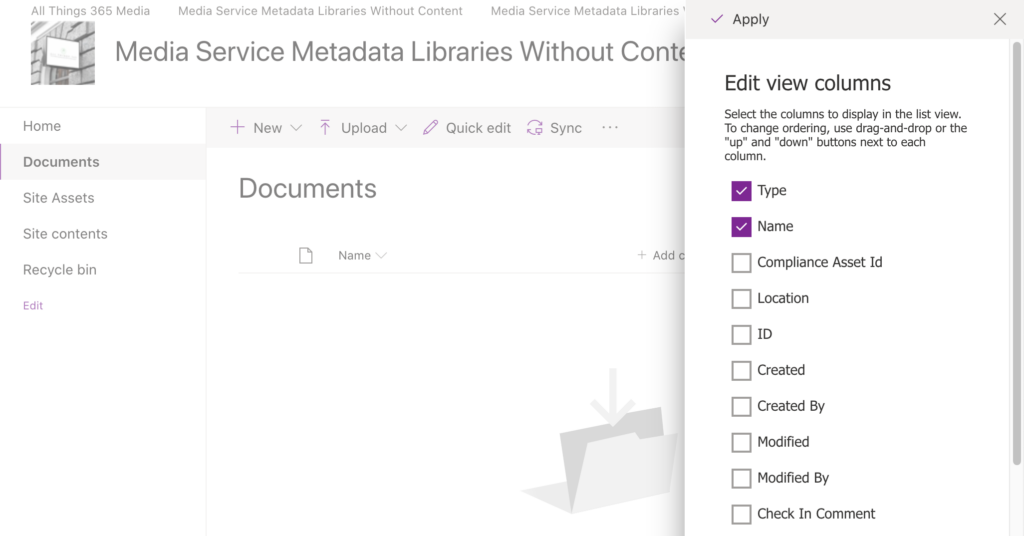
Should you navigate to any of the libraries on the new site and click on the Add Columns on the standard list view of the library you’ll notice certain columns such as Tags are not necessarily visible nor available for you to add to your list view.
Equally should you view a library of the same type in other team sites in your SharePoint tenant you will likely find that metadata columns such as Tags will in fact be visible and available for you to add the list view for those libraries.
The reason why certain metadata columns are not evident when a new library provisioned on any site for that matter is because those columns are only exposed when content is uploaded to the library and the metadata generation for the newly uploaded files are generated.
- Upload a collection of the same files to each of the four libraries on your test team site. Choose a variety of files of different types including pictures, videos, other media, documents and any other file types of your choosing.
- For the purposes of this blog and the corresponding demo app showcased, a collection of 15 files of different types were uploaded to a Document Library, a Site Assets Library, a Pictures Library and an Assets Library respectively.
- When identifying files you wish to upload I recommend choosing files you *know have at least some metadata embedded with said files. For example: for photos EXIF metadata; for documents keywords; for video media metadata and so forth.
- It will take several hours for metadata to be generated for any new content uploaded to any SharePoint library. For certain file types such as PDF documents it may *never be generated. As such do not expect the solution shared in this blog to surface additional metadata as that will in time be extracted when the media service metadata generation background process runs. If no metadata has been generated for any given file within 24 hours of uploading that file it’s unlikely that any additional metadata will be generated, for that file at least.
Power Automate Flow

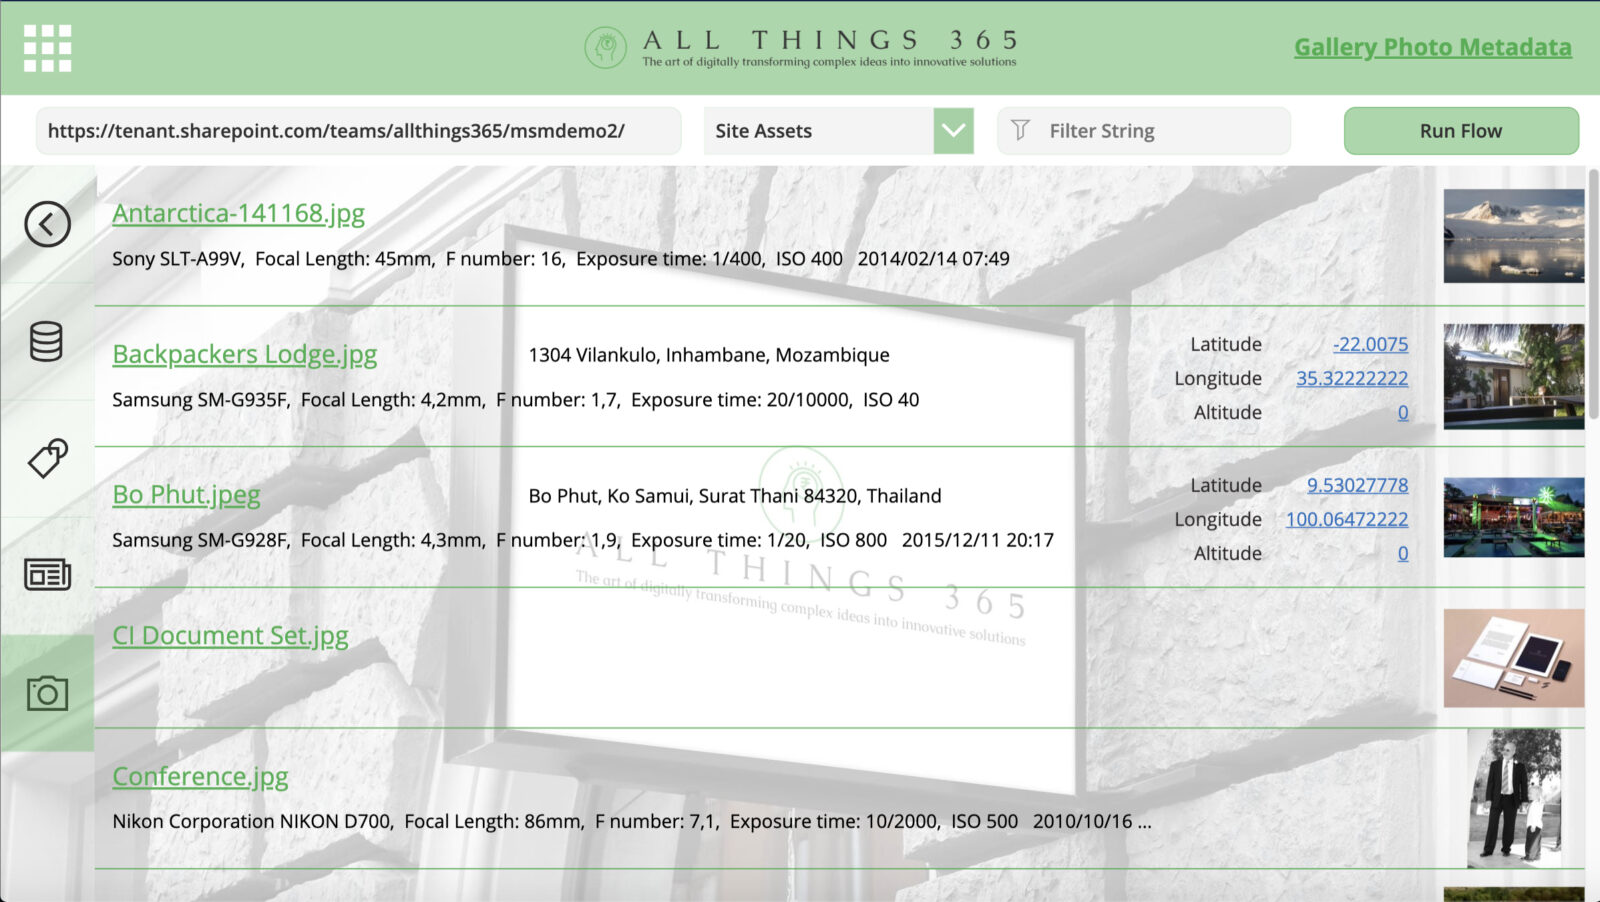
A Power Automate flow enables all the awesome metadata to be surfaced as showcased in the video demonstration of the Power App.
Approximately half of the steps in this flow pertain to initializing and/or setting the values of numerous variables used in subsequent steps in the Flow purely for readability purposes.
For practically every step in the flow I’ve added a comment such that the reasoning behind what each step does and the degree to which you may want to modify any given step for your own requirements.
By way of example:
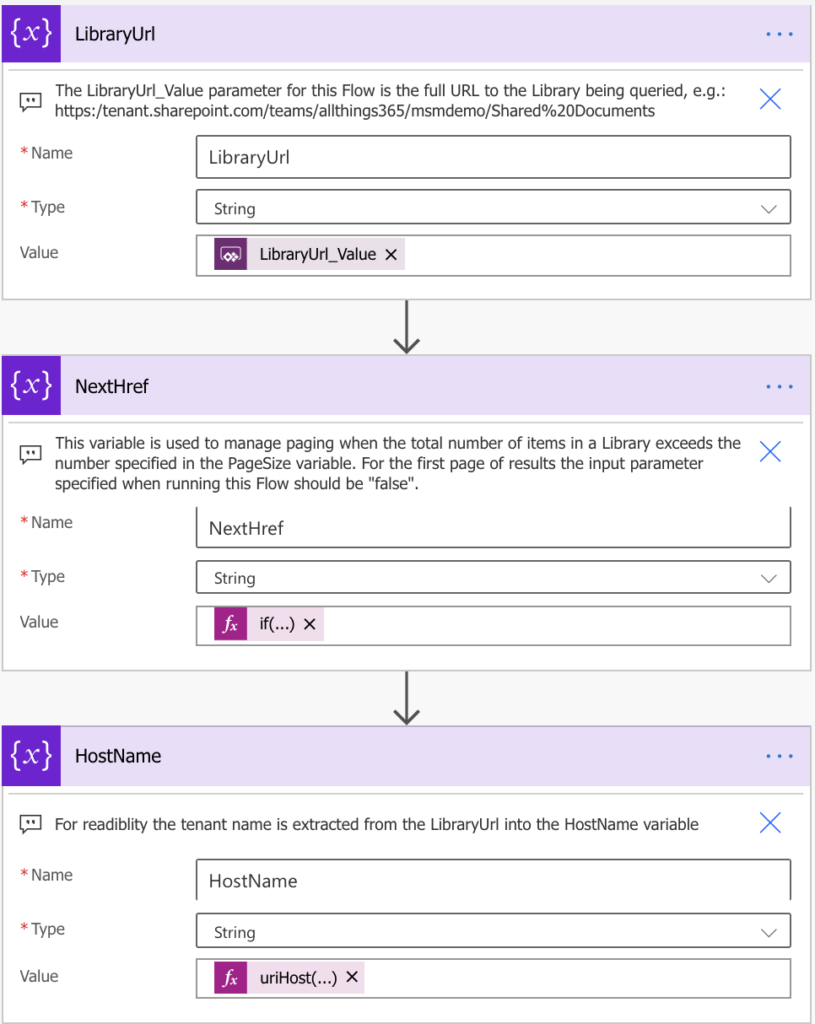
As I have added meaningful comments to the majority of the steps in this flow and given that I am sharing this awesome Power Automate flow and Power App, for the purposes of this blog I will only go into further detail on a few of the key steps in the flow.
SharePoint_Library_MSM Flow Demo
Rather than tediously documenting what to expect when you do a test run of the flow, I have recorded a demo thereof such that it should hopefully be easier to understand the just of what the flow does and why certain steps are in the flow that otherwise may not be obvious. Whilst the demo, being a touch shy of 30 minutes, is by all accounts quite long, watching the full demo should give you a lot of insight what this could do for you in your own apps.
So let’s take a look at what makes all this magic happen…
Instantiating the Flow – Input Parameters
Having imported the entire solution package you will need to test the flow at least once before you can use it elsewhere, for example in any Power App. This is necessary in order to authenicate the SharePoint connection used in the flow. When you test the flow, after authenticating the SharePoint connection, you’ll be prompted to specify 5 input parameters necessary in order to run the flow as follows:
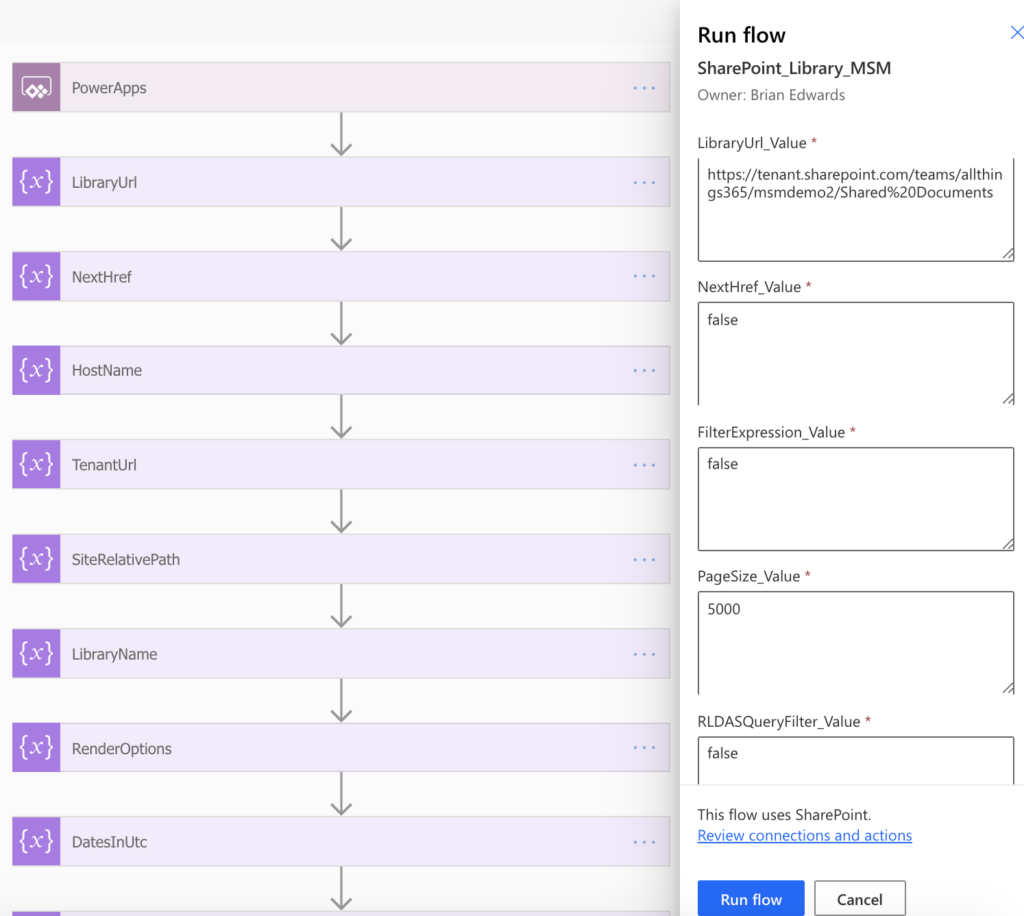
For your initial test run of the flow specify the various input parameters as depicted in the above screenshot, substituting only the LibraryUrl_Value parameter with the link to any one of your own libaries on your test team site in SharePoint.
https://tenant.sharepoint.com/teams/allthings365/msmdemo/Shared%20DocumentsRun the flow to validate that the test run completes all the steps as expected and that no errors occur. In the event that the flow fails make sure that the library you specified as an input parameter does in fact contain at minimum a few files.
If you have just uploaded the files to that library you may need to wait a few hours before the metadata has been *generated for that content. You can alternatively test the flow against any library on any other site in order to test the flow and validate it runs as expected.
At this point is worth mentioning that metadata is seemingly not generated for all types of files. Based on the limited testing I did for this demo no metadata was generated for a PDF file I uploaded to each of the 4 libraries and equally no metadata was generated for a MP3 file I uploaded. The PDF document definitely had some metadata embedded in the document such as keywords however that metadata was never extracted from the PDF document. Contrastingly keywords in a Word document were extracted such that those keywords could subsequently be surfaced in the Power App showcased in this blog.
Additionally on some sites at least not all columns expected in the Documents (Shared Documents) are created and as such for Document libraries at least the occasional error may occur. If so ignore the Documents library when doing you own testing.
Noteworthy steps in the flow
RenderOptions
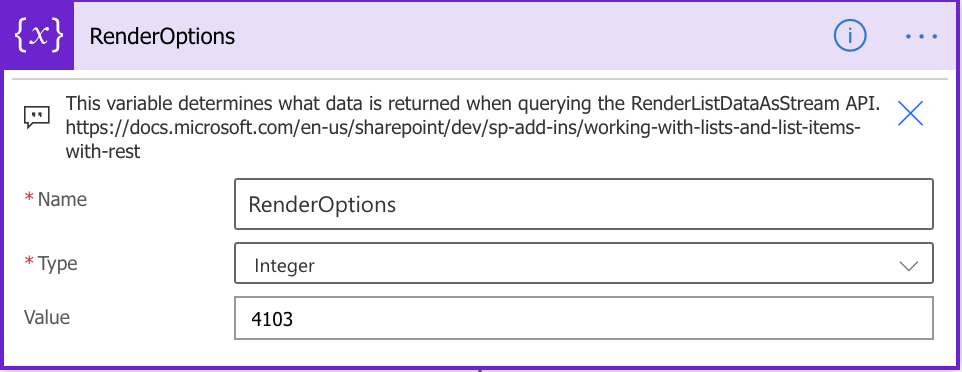
The SharePoint RenderListDataAsStream REST API requires a value to be specified for the SPRenderListDataOptions parameter. Without delving into too much detail, the value of 4103 in the flow shared enables a thumbail URL to be exposed (EnableMediaTAUrls) as well the total file count for the library being queried (ListSchema) and of course the item records (ListData & ContextInfo).
Graph API – Get List Metadata
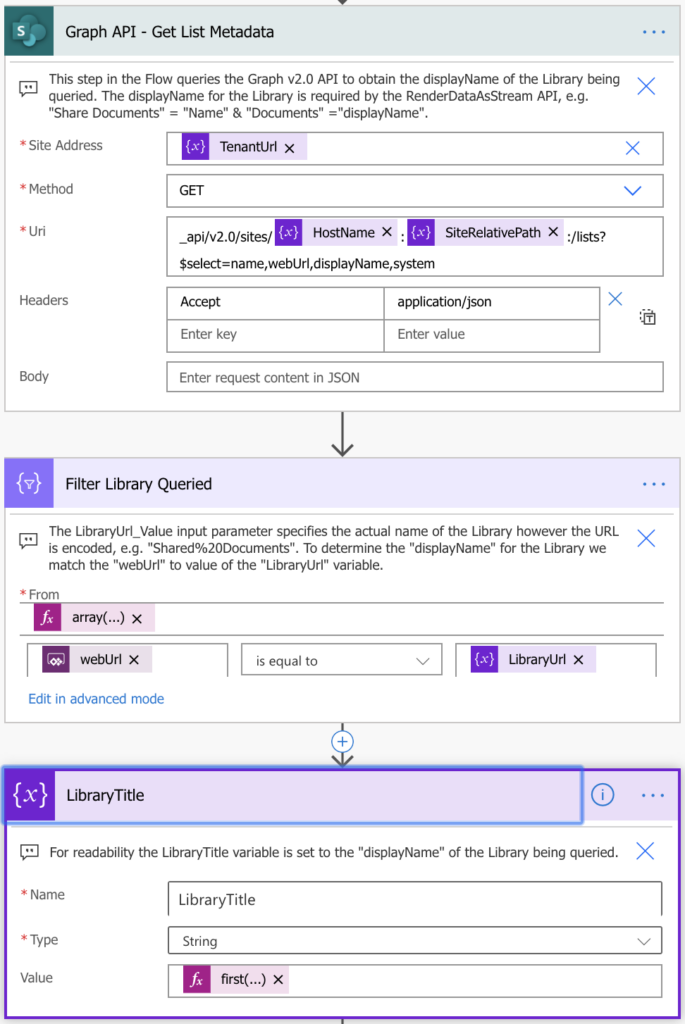
The RenderListDataAsStream API requires the Title of the library being queried to be provided. However in the LibraryUrl_Value input parameter of the flow the Name of the library is specified in the URL and not the Title.
To illustrate by way of example:
https://tenant.sharepoint.com/teams/allthings365/msmdemo/Shared%20DocumentsPer the example above “Shared Documents” is the library Name whereas “Documents” is the Title aka DisplayName of the library.
Thus in order to obtain the actual Title of any given library, the SharePoint Graph v2 Lists API is queried to return the collection of lists and libraries on the site inclusive of the DisplayName. The results are then filtered, matching the WebUrl exposed to the LibraryUrl_Value, subsequent to which the actual DisplayName of the library being queried is assigned to the LibraryTitle variable.
Send an HTTP request to SharePoint – RenderListDataAsStream
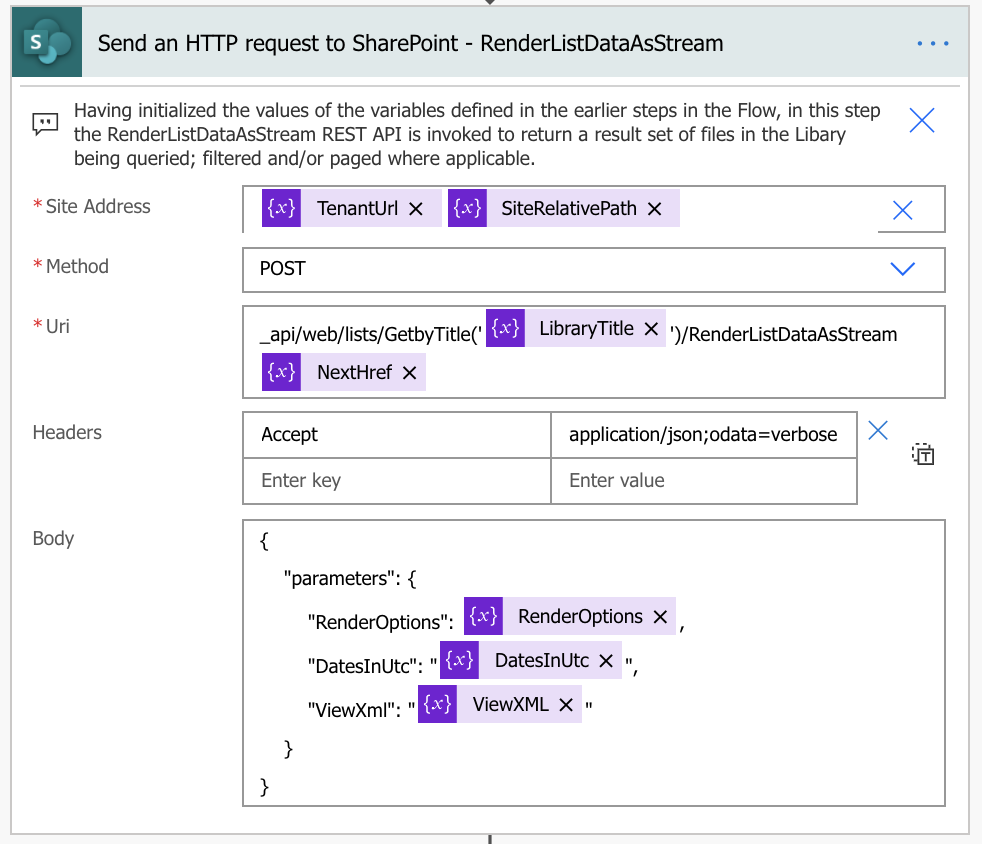
This step in the flow is where everything comes together and all the awesome promises begin to materialize. Having previously set values to the numerous variables depicted in this step of the flow, the actual complexity of what this step in the flow should (hopefully) be easier to follow.
Should you wish to have further insight insofar as the technical aspects of what this step in the flow does check out the Working with lists and list items with REST article on Microsoft’s Docs website.
In Part 2 of this blog series I will how similar outputs of this step can equally be surfaced using the SharePoint Graph v2 APIs. In the “anticipated” Part 3 of this blog series I’ll expand further on some more awesomeness we can do with this step in the flow. Watch this space…
Filter QueryResults Remove Folders
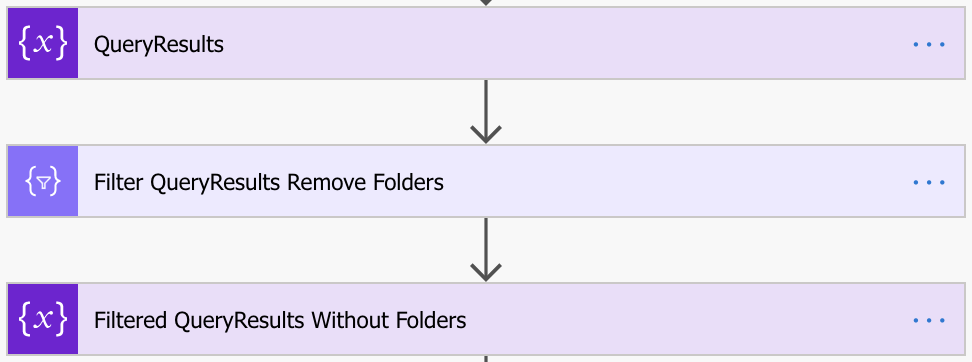
The purpose of these 3 steps in the flow are in essences to remove Folder type items that may be returned in the result set from querying the RenderListDataAsStream API in the preceding step in the flow.
Fields To Return
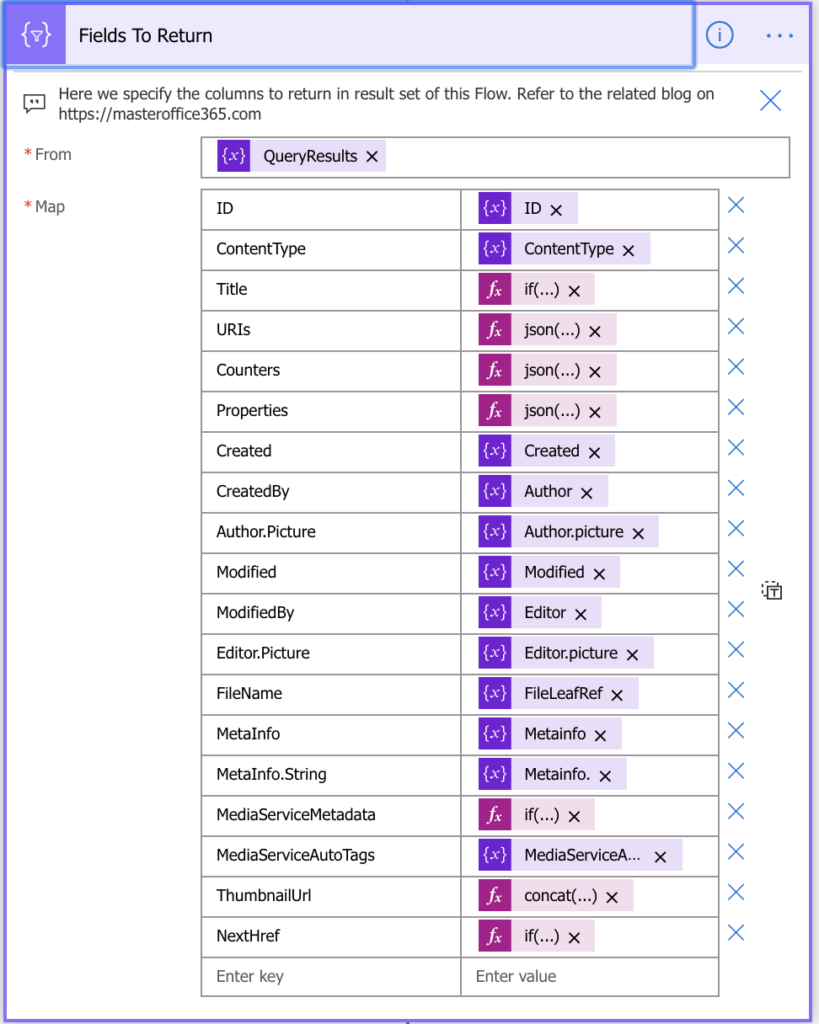
The Fields to Return step in the flow is where the majority of people reading this blog will quite likely be somewhat overwhelmed upon looking at some of the expressions mapped to fields that will be exposed when running this flow against any given SharePoint Library.
As with the 2nd demo video wherein I have shown by way of example what the outputs of this step in the flow will typically look like, for Part 1 at least in this blog series I won’t delve into detail insofar explaining any of the field mappings and/or expressions used to expose the content this step in the flow exposes.
Should you have any queries with regards to this step in the flow by all means post any comments you may have and I will do my best to cover those queries in the next part of the blog series.
Response
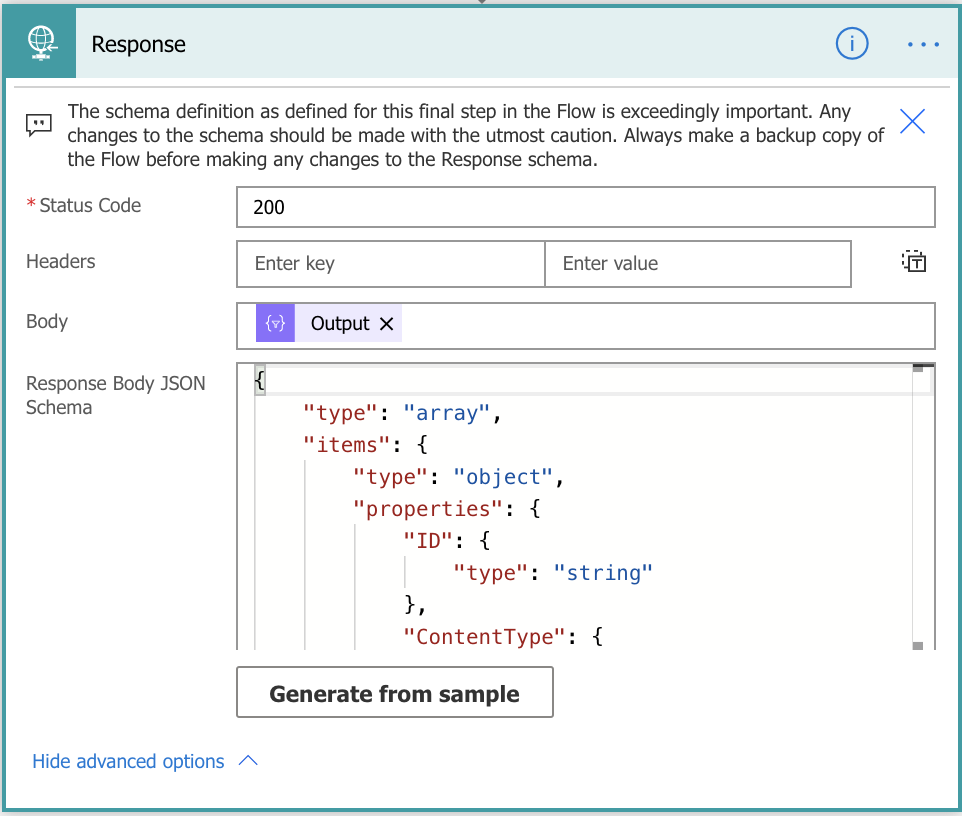
The final Response step in this flow is conspicuously anything but simple! In this step I have defined a strongly typed Response Body JSON Schema that, if modified, can wreak havoc in any apps you may create that consume this flow.
Again in the interests of sooner rather than later publishing Part 1 of this blog series, I elected to refrain from attempting to explain how or why I came upon this schema. Suffice to say it seemingly works quite well with the demo Power App I created. If need be I will explain it in more detail in Part 2…
Power App – All Things 365 MSM Showcase
Unlike any of the previous blogs I have posted, for a change, and perhaps more so because today is my birthday ?, I have decided to give this Power App in addition to the Power Automate flow as are showcased in the 2 demos away as my gift to you all ha-ha, however only if you at least like both of the 2 demo videos on YouTube (my reward).
If this solution excites you I would appreciate some recognition such that I know how many people think this blog, Power App and Power Automate flow is as awesome as I think it is, and that hopefully it will equally inspire you to leverage this IP in your own workplaces to build your own awesome apps. If so, here again are the links to the 2 demo videos on YouTube:
What’s next in Part 2 of this blog series?
In Part 2 I again demonstrate by way of the same awesome app showcased in this blog how you can equally surface a near identical result set, but this time using the SharePoint Graph v2 Drive Items API along with a 2nd Power Automate flow.
Each technique described in Part 1 and Part 2 respectively has both pros and cons. However, in sharing all the code in the Power App consuming both of the two flows and surfacing the data returned by each of the two flows (techiques) should by all accounts provide a real world example such that you can evaluate which techinque is easier to follow, enhance and implement for your own requirements and skillset.
Download the Power App & Power Automate flows as showcased in Part 2 of this blog series
The source code including the PowerApp and the associated Power Automate flows as described in Part 2 of this blog series have been shared on GitHub i.e. the updated v2 of this app vs. the v1 of the app as has been showcased in this Part 1 of the blog series.
GitHub – Power Apps, Power Automate & SharePoint Media Service Metadata Magic
Before uploading this Power App into your environment you will need to ensure the user uploading the package via the “Import canvas app” link in the Power Apps web studio has a Power Apps Plan 2 license or Plan 2 Trial license assigned to that user. If not, when importing the app you will probably receive an error message indicating the 2 flows associated to the app were not imported, with a rather obscure error message which, if you can find will inform you that user does not have a license plan necessary to import the app.
Per a thread on the Power Apps community site you can obtain a 90 day trial license in order to test and evaluate this app in your Power Apps environment per the following links for additional insight (and to sign up for the trial license):
https://powerusers.microsoft.com/t5/Building-Power-Apps/What-is-quot-Microsoft-PowerApps-Trial-Plan-2-quot/m-p/131622#M45812
https://powerapps.microsoft.com/en-us/#
Whilst I do not speak for Microsoft and as such cannot categorically state the necessary licensing requirements associated with users of this solution as is showcased (and shared) in Part 1 and Part 2 of this blog series, it is my understanding at least that a Power Apps Plan 2 licence is required for any/all uses managing and/or editing the Power App.
Each user of the app and therefore equally the 2 Power Automate flows consumed by the app will either each require a Power Automate flow Plan 1 license OR a Power Automate per flow (actually 5 flows) license which will accordingly almost certainly lower the costs of implementing a solution such as this one for numerous users in your organizations with the additional added benefit of both flows being exceedingly reusable for other use cases and apps you may create ?.
Speak to your Microsoft Licensing representative to see what works best for you.
All donations for sharing gladly accepted!
When I run this Power Automate Flow against a SharePoint library, I seem to be getting an error in the “Fields to Return” step denoting that the ‘substring’ parameters are out of range. I believe the error is coming from the MediaServiceMetadata function within that step. I have tried running the Power Automate Flow without that field, and it seems to run perfectly fine. However, I want to get the rich metadata info within the MediaServiceMetadata field. How would you recommend I go about doing this?
I’ll look into it and see if I can reproduce the error…
Sweet. Thank you so much!